|
THE SAMURAI SWORD ANATOMY -
It has been over one thousand years ago that the art of making swords appeared
in Japan. The swordsmiths of the time may not have known it but they were creating a legendary sword. The Samurai
sword has seen combat in many battlefields. From the early days of the Samurai warrior to the fierce battles in the
South Pacific during WWII.
Each hand-made Samurai sword is unique because it is forged from steel stock. A tremendous amount of work is
dedicated to creating these pieces. They were an instrument of war as much as a beautiful artifact to adorn
a room.
The Samurai sword has grown to be one of the most highly desired military antiques. The following section provides
an analysis of the anatomy of the Samurai sword.
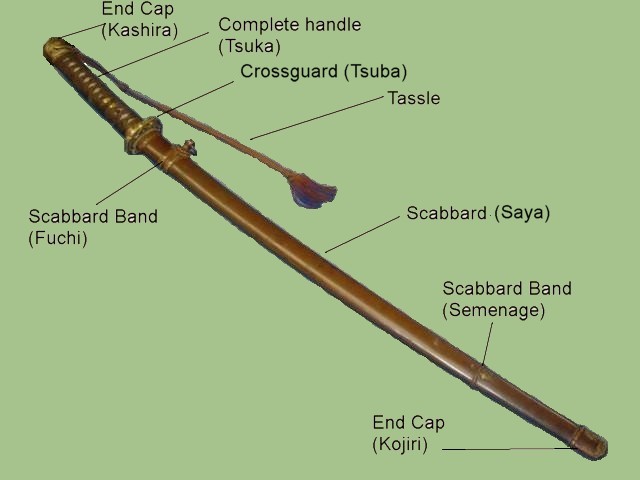
This is a view of the entire sword. This particular example is outfitted in WWII attire.
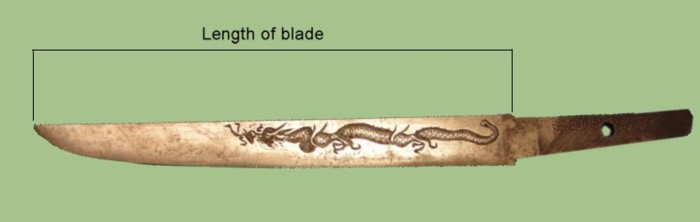
Measuring the length of a Samurai sword blade is performed by taking the size between the tip and the Mune-machi
(back blade notch).
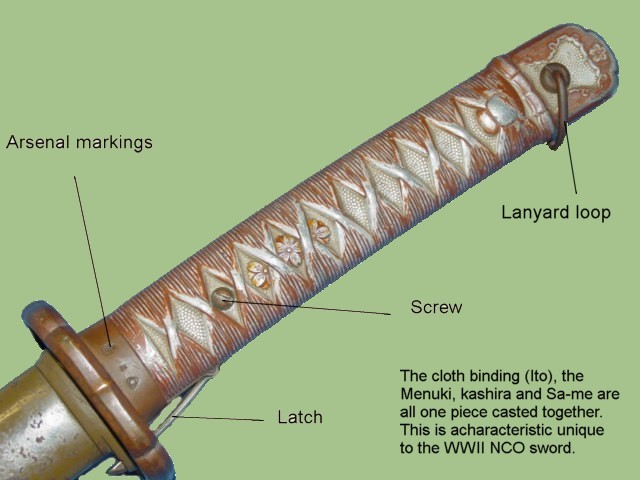
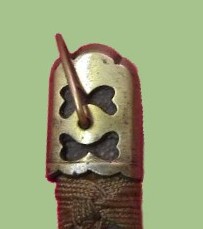
The following picture shows a closeup view of the handle of the sword. Once again this is done in WWII dressings.
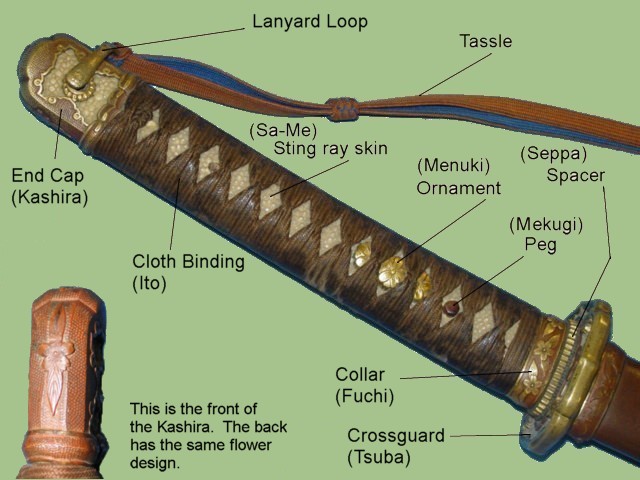
This picture is provided so the visitor can appreciate the differences between the regular Samurai sword handle
and that of an Samurai NCO sword . Note that the NCO sword
handle amde of one piece of metal. The locking mechanism is very visible. It consists of a spring latch.
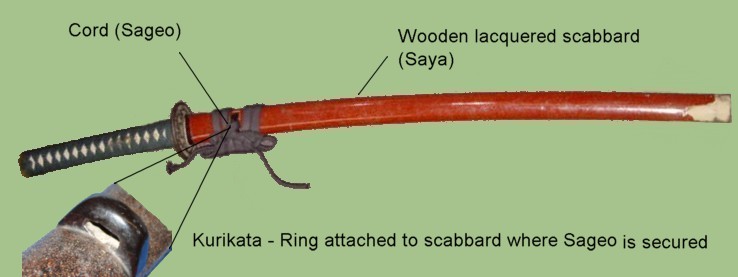
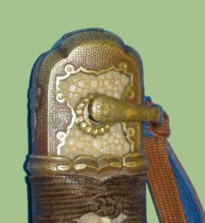
The following sword is outfitted in traditional dressings. Different types of accessories can be applied to
the scabbard. The Tsubas (handguard), Kashira (pommel) and Menuki (handle ornament) may vary greatly from
the WWII swords. The scabbard is usually made of wood and lacquered in different colors.
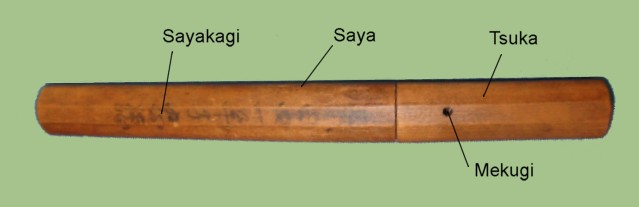
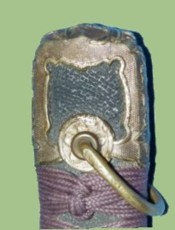
The swords were placed in all wooden scabbard and handle when they were being stored prior to mounting. The following photos
show an example of the storage mounting.

| 1 |
Sayakagi |
This is the Japanese writing found on the scabbard. It is important to note that not all of the scabards had this writing.
|
| 2 |
Saya |
The scabbard itself. |
| 3 |
Tsuka |
The wooden handle of the sword. |
| 4 |
Mekugi |
This is the pin that holds the blade secured to the handle. |
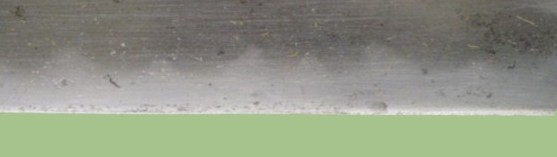
THE BLADE
The blade of the Samurai sword is the most important aspect of the sword.
The quality of steel can be readily appreciated when inspecting a blade.
There is texture and character built into it. The blade is not bright
like the modern replicas but rather dull in color.
Jitetsu is a term employed when refering to the texture and color of the
blade. This pattern comes from the manufacturing technique of folding
and hammering the blade multiple times. The Jitetsu provides the
principal means of dating a blade because it varies greatly from period
to period.
The Kamakura era is considered by many experts as the time
in which the highest quality blades were produced. Examples from these
years exhibit a dark gray velvet appearance.
When looking at the value of a Samurai sword some of the key questions that should be answered
are:
- Is the blade soundly made - With no flaws?
- What school produced the sword?
- Is there any wear or damage to the blade?
- Are the shape, the metal and the Hammon proper?
- In what period of Japanese history was it made?
Adittional aspects that should be considered when looking at the blade of a Samurai sword are:
- Length
- Thickness
- The size and shape of the Tang
- Width of the blade
- The size of the point
- The degree of curvature
If you want to see more information about the blade of a Samurai sword you may visit our section titled:
The Samurai Sword blade
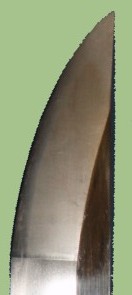
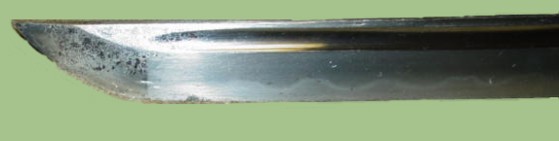
THE BLADE TIP
The tip of the blade of a Samurai sword is the most dangerous part of the weapon. In combat
the Samurai were able to make the tip cover great distances with a mere movement of their wrist.
The main targets of attack were the wrists, neck and elbow joints. When two Samurai faced each
other the battles would not last more than a few seconds.
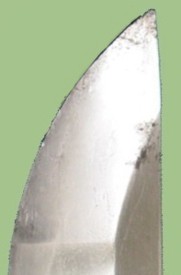
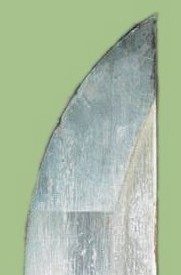
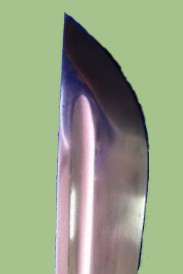
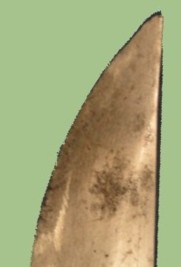
The following photographs show the basic blade tips of the Samurai sword. These are known as Kissaki.
 |
 |
 |
 |
Chu Tip . This is the most commonly found tip. |
Ikubi Tip. This is very similar to the Chu tip but it is shorter. |
Ko Tip. Has a smaller Boshi and more blunt cutting edge by tip. |
Re-tipped. Usually the result of re-shaping the tip to fix tip damage. |
Okissaki tip. Identified by its long tip.
This style is harder to find. |
 |
|
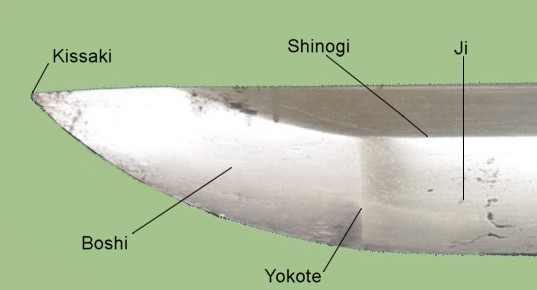
Samurai sword blade tip terminology. Refer to the above graphic for placement of terms.
| 1 | KISSAKI: | Point of the sword. |
| 2 | BOSHI: | Pattern of hardened edge on the point. |
| 3 | YOKOTE: | The line which divides the point from the body. |
| 4 | JI: | Blade surface located above the hamon. |
| 5 | SHINOGI: | Blade ridgeline. |
To see more information about tips visit our section titled:
The Samurai blade tip.
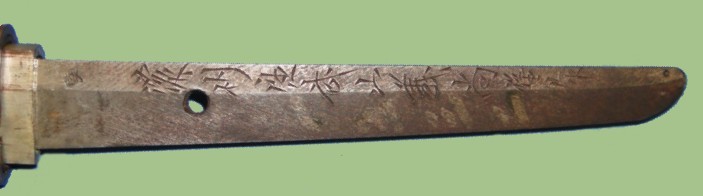
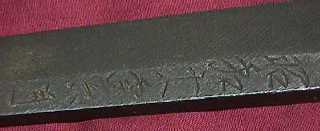
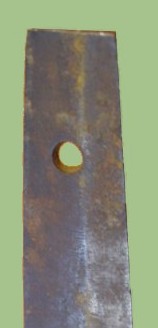
THE TANG - BLADE SIGNATURES
Samurai swords bare the signature of their maker on their tang. However,
the only swords that were signed were those that met the standards of the
maker. Therefore, it is possible to have two blades made by the same person
and yet have one that is not signed.
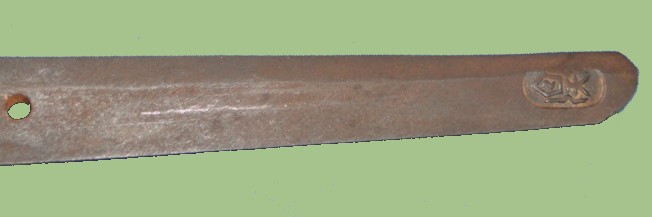
Additional markings to the blade included factory stamps. The tang shown below has such a stamp applied to the end section.
There were several factory stamps available during WWII.
The collector must be aware that signature forgeries have been going on
since the early days of sword making. Lesser known swordsmiths would
copy the signature of more famous craftmen and chisel it on a sword. The
fact that a signature is old does not necessarily mean that it was made
by a famous master. Other characteristics of the blade will dictate if the
signature is real or not.
|
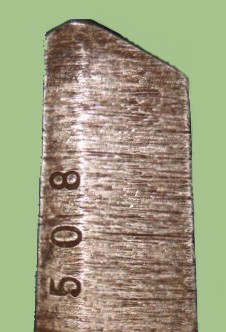
Often times the tang contains incriptions on both sides. One side houses
the date of manufacture while the other side contains the name of the
maker. If the information was available, the side with the name may also
have the title of the maker and the town or school where the blade came from.
Normally the side where the the date is shown will have seven characters. The signature can be as few as one character.
|
Unlike the blade the tang was never polished. As a last step in the sword
making process, the master would draw a pattern of lines on the tang and
then chisel the inscriptions on it. The collector should never clean the
tang of a sword because it contains a great deal of information regarding
the age of the blade and authenticity of the signature.
If you are interested in learning more about the sword's markings we have created a section dedicated to
how to read the Samurai sword signatures
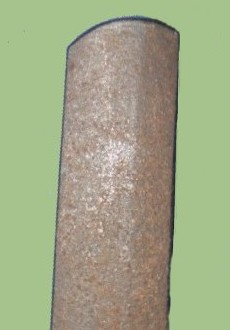
THE TANG - TIP SHAPE
The tang of the Samurai sword comes in a variety of shapes. Some of these were created by the swordsmith as a trademark.
Others are the result of the shortening of a blade. The shape of the tang is known as "Nakago-Jiri".
The following photos illustrate some of the different shapes of Nakago found on the swords.
 |
 |
 |
 |
Kuri Jiri tang style. This type is characterized by the use of a smooth rounded surface. Composed
primarily of a single line. |
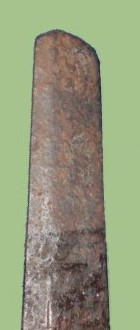
Haagari tang style. Two rounded lines are meeting at one point. Usually one line is shorter
than the other. |
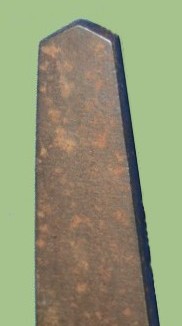
Kengyo tang style. This tang tip is identified by the presence of teo straight lines meeting at one point
where one line is usually shorter than the other. |
Kiri tang style. This is the type of tang normally seen on swords that have been shortened. Consists of a
flat end. |
 |
Liyamagata Tang. This type is composed of three lines. Two of them coming to a small flat section found at
the very top. |
You can learn more about this part of the Samurai sword by visiting our section titled:
The Samurai Tang
THE TSUBA - HANDGUARD AND COMPONENTS
The handguard of the Samurai sword is known as the Tsuba. It is of metal construction. the shape of the Tsuba
is normally round or rectangular. However, some masters created shapes that are not easily categorized into those
two shapes.
The main purpose of the Tsuba is to protect the hand of the warrior from the incoming strike of another weapon.
 |
|
 |
| 1800's type Tsuba |
|
WWII Naval Tsuba |
Tsubas can be very plain in design, as they were in most of the mass-produced Samurai swords during WWII or highly
ornate. True master pieces, as they are when they are manufactured by artisans.
During WWII most of the swords that were created had a round shape and contained the designed of a chrysanthemum
flower, which was the symbol of the Japanese Imperial Army. Not all of the WWII swords were outfitted with standard
Tsubas. Some of them were equipped with older Tsubas that were more ornate.
There are some individuals that are dedicated to collecting Tsubas exclusively. The Tsubas can be displayed in beautiful
wooden cases with felt backing.
If you want to learn more about this topic visit our
Japanese Samurai Tsubas section.
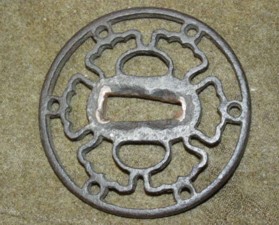
 |
|
 |
|
Placement of all components om the tang. The Tsuba is in the middle while the spacers (Seppa) are located to the left and
right of the Tsuba. Notice the sqaure opening on all sections to allow the locking mechanism to go through.
|
|
Naval Tsuba and spacers (Seppa) for one side. An equal number wold be placed on the other side.
|
The Tsuba is secured in place via the use of a series of spcers. These items act like washers that help seat
the piece firmly to the base of the blade. Once the sword has been taken apart, there are times when getting the
spacers to sit back properly can be a challenge. If they do not fit properly the spacers will move and make
noise as the sword is shaken. Hitting the pommel with a rubber mallet as the tip of the blade faces up may
help solve this problem.
Each of the spacers in some of the swords is marked with matching characters. This was done to demonstrate that
all the parts were put together at the same swordsmith shop. The markings may consist of Arabic numbers or
Japanese markings (Kanji).
THE POMMEL
The Samurai sword pommel is a metal piece located at the end of the handle. .It is the closest part to the body
of the warrior when he is holding the sword in a combat stance. The Japanese name is Kashira. Several examples of the
pommel are illustrated in the following photographs.
 |
 |
 |
This is a WWII naval Samurai sword pommel. Metal construction. Sparse decorations found in body.
|
This is an example of a late war pommel. Poor quality construction and fit. Plain design.
|
This is a 1944 Shingunto pommel. Rounded design with little ornamentation other than light pebbling.
|
 |
 |
 |
This is the standard WWII pommel. Of metal construction with pebbling and flowers in front and back.
|
This is a flat, plain pommel. Of brass construction. Often seen in late war swords.
|
This is a pommel from an older sword. The design is more intricate. It was hand made.
|
The design of the pommel can be very basic or highly ornamental. In general, the swords that were mass produced
during WWII have a very plain pommel. The hand made swords produced before and after WWII tend to have more
ornate designs. They are created by true craftsmen who specialize in this art.
The standard pommel for the Japanese Imperial Army during WWII was of a bronze color and had the design of a large
chrysanthemum on the front and back.
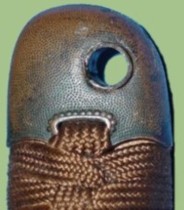
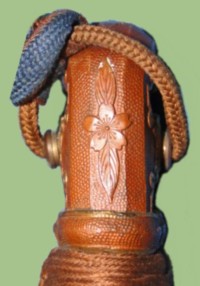
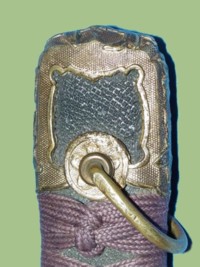
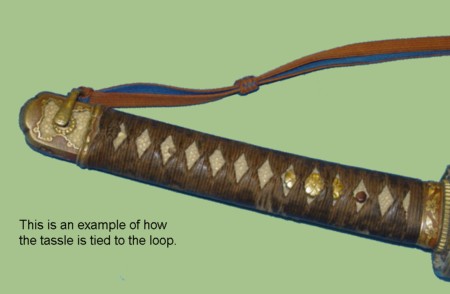
THE TASSLE LOOP
The pommel area in the handle normally has a hole that passes through the entire width of the handle. A loop is placed here
for the purpose of securing the tassle or a lanyard. The design of the loop can vary greatly and be constructed of
different types of material.
 |
 |
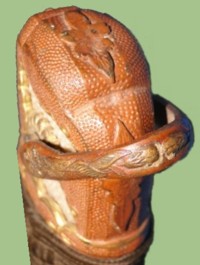 |
Metal construction. Known as the "Monkey hands" design due to its ressemblance of two holding hands.
|
Cloth construction. String design. This is a late war type employed as metal became scarce.
|
Metal construction. Flower design. This is the most common pattern found during WW2.
|
Metal construction. Of wire design. No ornamentation applied to the surface.
|
 |
THE HAMON
During the manufacturing process the blade is covered in a special
insulating clay which is then heated to extreme temperatures, then
water is poured on the mix. These steps provide a hardened edge with a
visual pattern that loosely resembles the pattern in which the clay was
applied. A common practice which often followed was that of polishing the
hamon to make it stand out more from the rest of the steel.
GUNOME Hamon pattern. consists of a zig zag line.

YAHAZU Tang pattern. This is a design with notches.

TOGARI hamon pattern. Consists of pointed characteristics.
SUGU hamon. The design is that of a straight line.

HAKO hamon pattern. This is the box shaped hamon.
As a general rule older blades have a narrow and straight and narrow hamon. One of
problems experienced when fighting with older blades was that the hamon
would chip horizontally following the edge of the blade. The other problem that could
occur is that a chip could easily go through a narrow Hamon, requiring extensive polishing
to correct the edge. This could easily cut into most of the Hamon.
The Heian period saw the introduction of wider hamons. This is
the period where the serrated, toothlike hamons (gunome) were invented.
Each tooth projection is known as ashi. This design greatly reduced the
chiping problem and confined the maximum size of any lateral breaking to
the distance between two ashi. The pattern of the ashi were also used
as a signature of particular schools.
You may find more information about the Hamon by visiting our section titled:
The Samurai sword blades
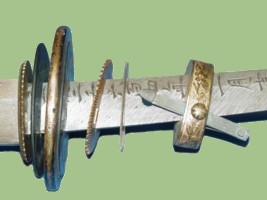
THE HABAKI
Samurai swords are designed to fit loosely inside the scabbard. When pulled out, the sword will slide on its
back. This is why the sword is worn with the curved side down.
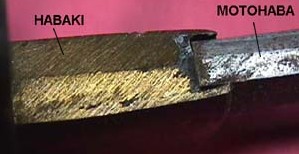 |
in battle, the Samurai warrior would be moving constantly. Whether riding a horse or on foot. The need was clear
to develop a way in which the sword could be held securely inside the scabbard - Enter the Habaki.
The Habaki is a wedge shaped piece of metal collar placed at the base of the blade. Right against the two notches
that indicate the begining of the tang. The Habaki has a tapered shape which allows the blade to be held snuggly
to the opening of the scabbard.
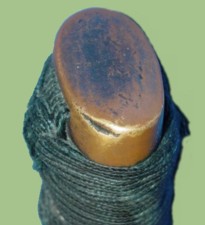
The Habaki is most commonly made of copper. However, it has been covered in different types of material
throughout time. A gold cover has always been very popular.
|
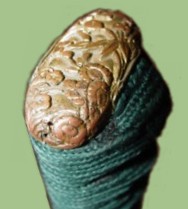
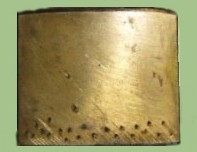
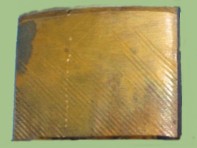
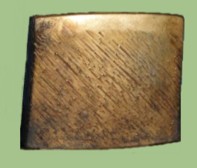
The following photographs show some of the variations found in the Habakis. Most Habakis were constructed of a single
piece. However, some were created with two pieces.
 |
 |
 |
Brass Habaki with "bump" design in lower section. |
Two piece Habaki with a different design in each section. |
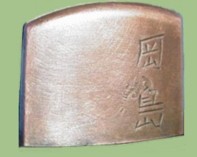
Copper Habaki with markings. Not all of the habakis were marked. |
 |
 |
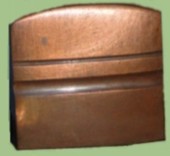 |
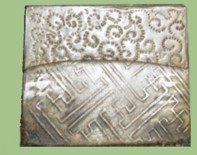
Habaki with 80 percent of its surface covered in "rain pattern" ornamentation. |
This is a full "rain pattern" Habaki. This is one of the basic designs. |
Copper Habaki with two separating line design. |

|
WE BUY JAPANESE SWORDS - All types of Japanese edge weapons. Whether it is a WWII era Samurai sword or an
older type of blade.
The process gets started by you sending us an
Email .
We will respond to your inquiry normally within 24 hours and in many cases much faster.
We can tell you what you have, what it is worth and how much we can pay you.
One sword or an entire collection -
Email Us .
|
 |
This service is provided free of charge to the visitor/enthusiast courtesy of
MilitaryItems.com,
a company dedicated to the preservation of military history and to providing quality
military antiques and collectibles to museums, institutions and the general public.
If you have an interest is seeing other Japanese Samurai swords, you can do so by going to our
Japanese Samurai Swords Price Guide
identification guide. Where we cover Samurai swords from all periods.
|