UNDERSTANDING THE SAMURAI SWORD -
This page is dedicated to providing the novice with a basic understanding of the Samurai sword.
The information covers how to determine if the sword is from the WWII period, how the sword is put together, where to find
the signature of the blade and other topics.
Several photos are provided to help illustrate the different topics. also visit our
Frequently Asked Questions section to learn more about the Samurai swords.
This information is brought to you courtesy of
MilitaryItems.com .
The provider of military antiques and collectibles on the web.
BASIC SWORD ANATOMY
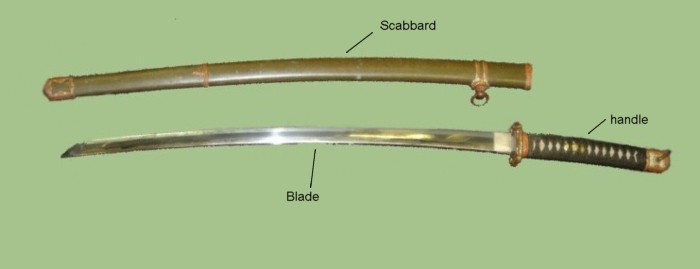
The Katana Samurai sword is the most common edge weapon of Japan. This is a single edge blade which is normally curved.
This weapon was worn by the Samurai warrior. The blade can be housed in a variety of fittings. The ones that are most
comonly found are those with WWII attire, such as the sword in the photo below.

The information shown here is very basic. if you want to learn more about the anatomy of the Samurai sword visit
our Sword Anatomy section .
There are
three basic types
of Samurai swords. Where the type of sword is determined by the length of the blade. The three types are:
- Katana - Measuring 24 inches on up
- Wakisashi - Measuring 12 to 24 inches
- Tanto - Measuring up to 12 inches
The way blade is measured from the tip to the back blade notch (known as Mune-Machi).

|
HOW TO TAKE THE HANDLE OF A SAMURAI SWORD OFF
|
The handle of the Samurai sword is secured in place by one or two wooden pegs, known as Mekugi. The following
photographs show an example of a handle being held together by a single peg. Sometimes the pegs are difficult
to see because they may be covered by the cloth wrapping.
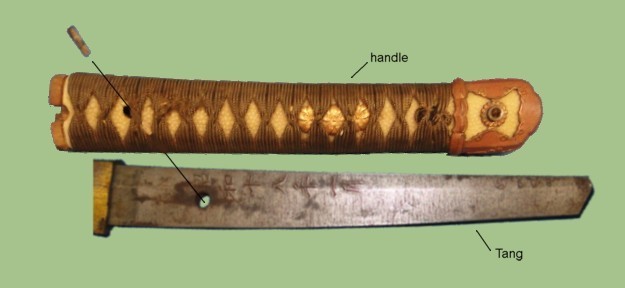
Removing the handle off the Samurai sword can be an exercise of patience. Take your time, take a breath and think
every step through so you do not cause any damage to the sword or its components.
 |
Getting ready for the job includes making sure that you have the right tools to
take the handle off the sword. Make sure you have a Phillips screw driver or
something with a blunt tip. A pair of needle nose plyers and a rubber mallet.
If you do not have a mallet you can use a boot with a rubber sole. The heel can be used
as a striking surface.
The following steps must be taken in order to remove the handle from the Samurai sword:
|
 |
STEP 1
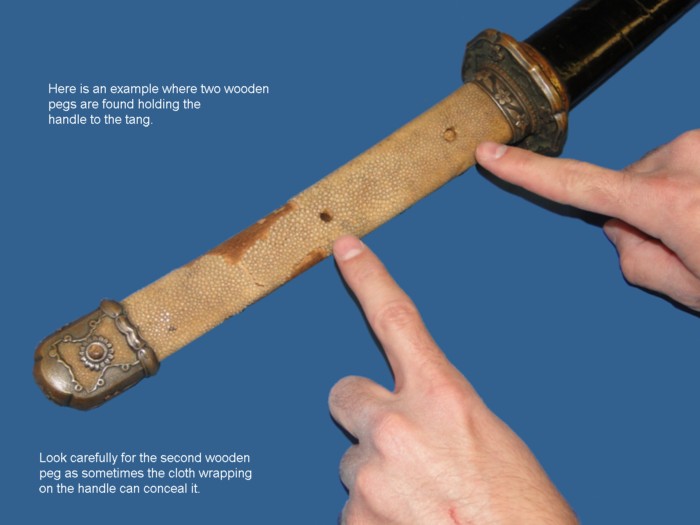
Determine how many wooden pegs hold the handle to the tang of the blade. The most common instance is to find
one peg. However, there are cases where two wooden pegs were applied to the sword.

STEP 2
When the sword was put togeher the wooden peg was inserted from one side. To take the handle off the sword
you must reverse the process.
Remove the pin by pushing it from one side. Take a look at both sides of the wooden peg then determine which
side is best to push. Use the right tool for the job. A common household item such as a Phillips screw
driver can do the job. However, be aware that this tool may cause slight damage to the top of the wooden
peg. If you have a tool with a flatter tip it would help avoid damaging the peg.
Removing the peg can be a fairly easy task but there are instances in which the peg is held very firmly
and the only way to get it out is to nearly destroy it, which is OK as not having the original peg does
not detract from the value of the sword.
Note that one end of the peg may be thicker that the other. You want to push at the thinest point.

STEP 3
Using a pair of needle nose plyers grab the exposed end of the wooden peg and ease it off. While the peg could
have been pushed all the way out, using the plyers helps minimize the damage to the wooden peg. The handle
is now ready for removal.

STEP 4
Once the pin is removed the handle comes off revealing the tang. Sometimes the handle comes off easily and other times
it does not. The same goes for the wooden peg. In some cases they come off easily but in others it is a struggle to
remove it.
If the handle is refusing to move you must use a rubber mallet to strike the handguard to break the hold loose.
Holding the handle with one hand strike the crossguard (Tsuba) down in the direction of the tip of the blade.
You may have to strike the crossguard in multiple places to help ease the handle off.
Start with light strikes and increase the force of the hit as necessary.
If you do not have a rubber mallet you may substitute with a rubber sole boot.

STEP 5
With the seal of the handle broken it can be removed revealing the tang of the blade. Some of the parts
you will also see are the spacers, known as Seppa, and the crossguard, known as
Tsuba.
The purpose of the spacers is to provide the proper clearance for the holes to line up between the handle
and the tang, to give the right height for the latching mechanism to work and to act as a washer. Make sure to
keep track of the position of each spacer so you can put the sword back together without many problems.
In most cases the spacers and Tsuba have a hole in one side which allows the locking latch to pass through.

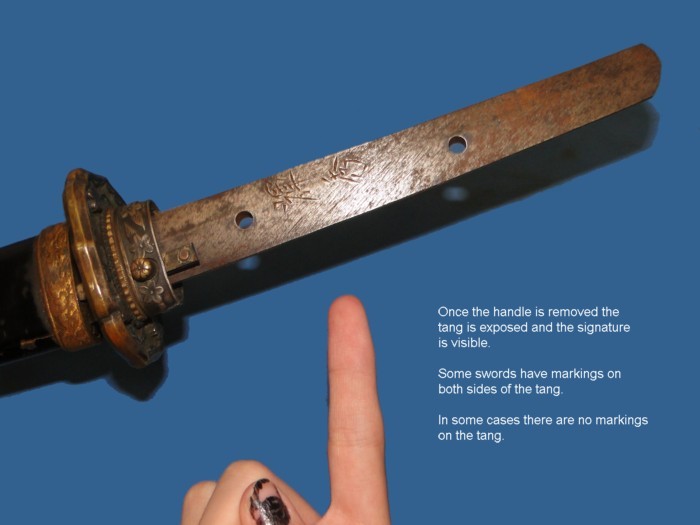
A signature may or may not be present on the tang. In some cases the tang was not signed. Some examples will
have markings on one side only while others will have markings on both sides. To learn more about the
blade signatures and how to translate them refer to our
"Reading Samurai sword signatures"
section.
|
This page is a recognition and identification guide for Samurai swords.
Multiple detailed photos of a specific sample are provided. Descriptions point
out clearly defined points that should be noted.
One of the most commonly asked questions is "How much is my Samurai Sword worth?".
A price guide is included here to address this question. The value of the swords is
reviewed over a period of several years. A trend can be observed. The present worth
of the edge weapons in the collector's market is illustrated.
This service is provided free of charge to the visitor/enthusiast courtesy of
MilitaryItems.com,
a company dedicated to the preservation of military history and to providing quality
military antiques and collectibles to museums, institutions and the general public.
|
|
|
SAMURAI SWORD HANDLE COMPONENTS
|
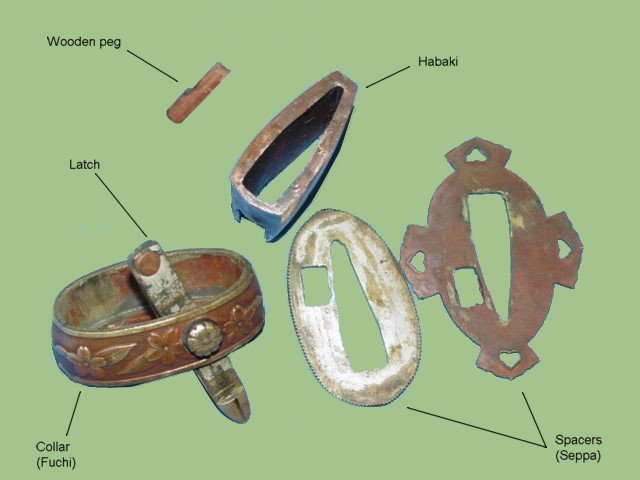
The following are the basic components that are used to keep the sword together. They include a wooden
peg(s), the Habaki, the collar (Fuchi) and latch, the spacers (Seppa). The parts can be manufactured
from different materials which in most cases involves some sort of metal.
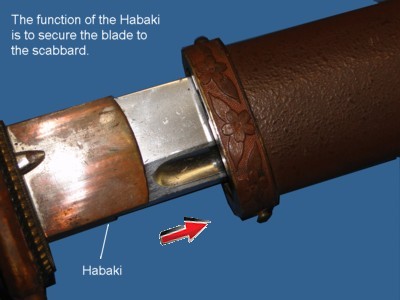 |
The Habaki
This photo illustrates the Habaki as applied to a sword. In this case the Habaki is manufactured from Brass.
The purpose of the Habaki is to help secure the sword to the scabbard. It achieves that purpose by pure friction
as it is wedged against the wooden walls of the scabbard.
The Habaki can be very plain in appearance, such as the example illustrated here, or can be quite ornamental.
A separate artist could create simple line patterns across its body or add extra metal to create more
intricate designs.
Like many other parts in the Samurai sword the Habaki serves a function of purpose as well as being
appealing to the eye.
|
|
Parts working together
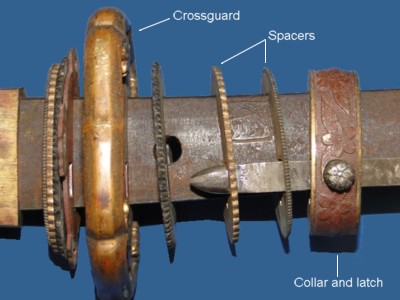
This photo shows the placement of the different components of the Samurai sword. Notice that the
signature
of the sword maker begins to become visible as the components are pulled apart.
The spacers and the
crossguard
also keep the blade from going too deep into the scabbard. Without them
the blade can be inserted too far and the Habaki can lock it in place making it difficult or next to
impossible to draw the sword out.
The spacers also served the function of providing the right height for the locking mechanism to
be able to attach to the scabbard. They also give the proper alignment so the holes in the handle
and tang can match to allow the wodden peg(s) to
be placed.
|
 |
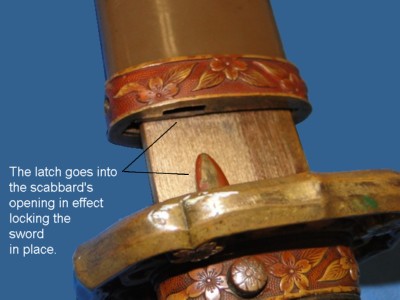 |
Locking mechanism
Most of the WWII swords came equipped with a locking mechanism which secured the blade in place inside the
scabbard.
A button placed on the side of the collar (Fuchi) is connected to the spring-loaded latch. Pressing the
button releases the latch allowing the sword to be drawn out. Make sure to look for this button when
taking the sword off the scabbard. People who force the sword out may compromise the latch and overall
mechanism.
Some of the WWII Samurai swords were equipped with a leather strap attached to the handle with a snap
on the end. Passing through the cross guard then snapping to a stud placed on the scabbard.
|
Swords older than WWII did not have any locking mechanism other than using the Habaki to secure the blade
to the scabbard.
|
PUTTING THE HANDLE OF THE SAMURAI SWORD BACK TOGETHER
|
To put the handle back on the sword the process is reversed. Find the opening and push the peg through it. The most difficult
thing at this stage is to line up the hole in the handle with thay of the tang. Try to place the peg in the same location in
which it was found originally .
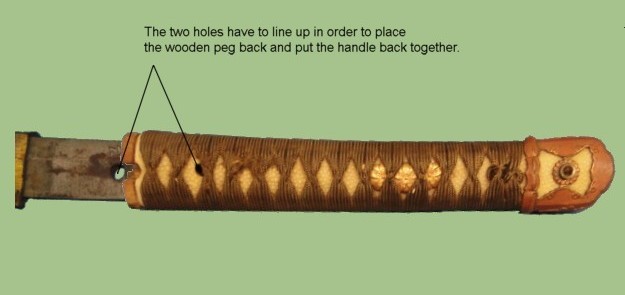
The Photo above shows the two holes that need to be aligned so the wooden peg can be placed back. The steps
described in this section apply to swords of all ages.
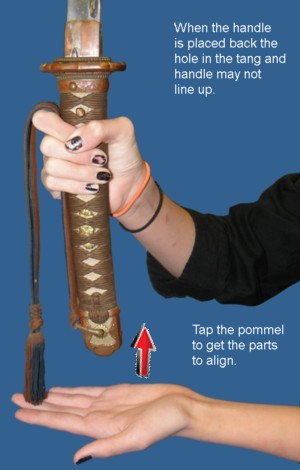 |
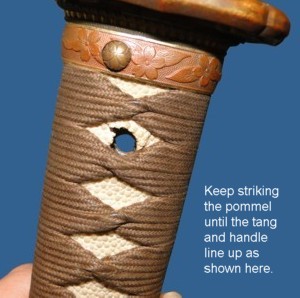
Hold the handle of the sword on one hand then strike the pommel until the holes line up. Place the pin
back. The handle is now secured.
Note: Once the wooden peg is put back on it may be difficult to remove it again. You may not
want to push the peg all the way in. Unless you are going to use the sword it is not necessary to secure it
all the way.
|

|
WE BUY JAPANESE SWORDS - All types of Japanese edge weapons. Whether it is a WWII era Samurai sword or an
older type of blade.
The process gets started by you sending us an
Email .
We will respond to your inquiry normally within 24 hours and in many cases much faster.
We can tell you what you have, what it is worth and how much we can pay you.
One sword or an entire collection -
Email Us .
|
 |
If you would like to learn more about Samurai swords visit our
Samurai sword page , where you will find a wide
array of information on the topic. Including over 50 different examples of Samurai swords.
This information is brought to you courtesy of
MilitaryItems.com.
The premiere provider of military collectibles to musuems, educational institutions and the general enthusiast.
|


