Donate
Donate to Us.
| SECTION I | --------------------------------- | GENERAL |
| SECTION II | --------------------------------- | DAY AND NIGHT COMBAT |
| SECTION III | --------------------------------- | DAY COMBAT |
| SECTION IV | --------------------------------- | NIGHT COMBAT |
| SECTION V | --------------------------------- | NIGHT VISION |
SECTION 1. GENERAL
4. Purpose The purpose of combat training is to mold you into a tough, self-reliant, fighting man, capable of performing effectively as a member of your team; to help you build and maintain an aggressive spirit the will to close with and kill or capture the enemy.
5. Phases Of Combat Training
a. Combat is a continuous process-contact with the enemy must be constantly maintained. You must be able to fight by day or by night. Therefore, your training is in two general phases: training for day combat and training for night combat.
b. Some of your training prepares you to fight by day; some is especially applicable to night fighting; but most of your training applies equally to day or night combat.
c. You must consider visibility in deciding whether to apply day or night principles and techniques.
(1) For example-
(a) A bright moon or artificial illumination may provide better observation than a dark, overcast day.
(b) Heavy fog, rain, smoke, or dust may gTeatly reduce visibility, day or night.
(c) The period before sunrise is usually too dark for strictly day techniques, and the period before sunset is usually too light for strictly night techniques.
(2) Under such conditions, it may be necessary to vary yom· techniques, or to combine day and night principles and techniques.
SECTION II. DAY AND NIGHT COMBAT
6. Cover and Concealment.
a. Cover is protection from the fire of enemy weapons. It may be natural or artificial. Natural cover (ravines, hollows, reverse slopes) and artificial cover (foxholes, trenches, walls) protect your from flat trajectory fires and partially protect you from high-angle fire and the effects of nuclear explosions (fig. 1) . Even the smallest depression or fold in the ground may provide some cover when you need it most. Properly used, a, 15-centimeter (6-inch) depression may provide enough cover to save your life under fire. Form the habit of looking for, and taking advantage of, every bit of cover the terrain offers. Combine this habit with proper use of the movement techniques explained in paragraph 22 and you can provide yourself with excellent protection from enemy fire.
b. Concealment is protection from enemy observation. It, too, may be natural or artificial. Remember that concealment is not protection from enemy fire. Do not make the mistake of believing you are protected from enemy. fire merely because you are concealed from enemy eyes.
(1) Natural concealment is provided by-your surroundings and needs 110 change to .be used ; for example, pushes, grass, and shadows.
(2)Artificial concealment is made from materials such as burlap or nets, or from natural materials such as bushes, leaves, and grass which are moved from their original location.
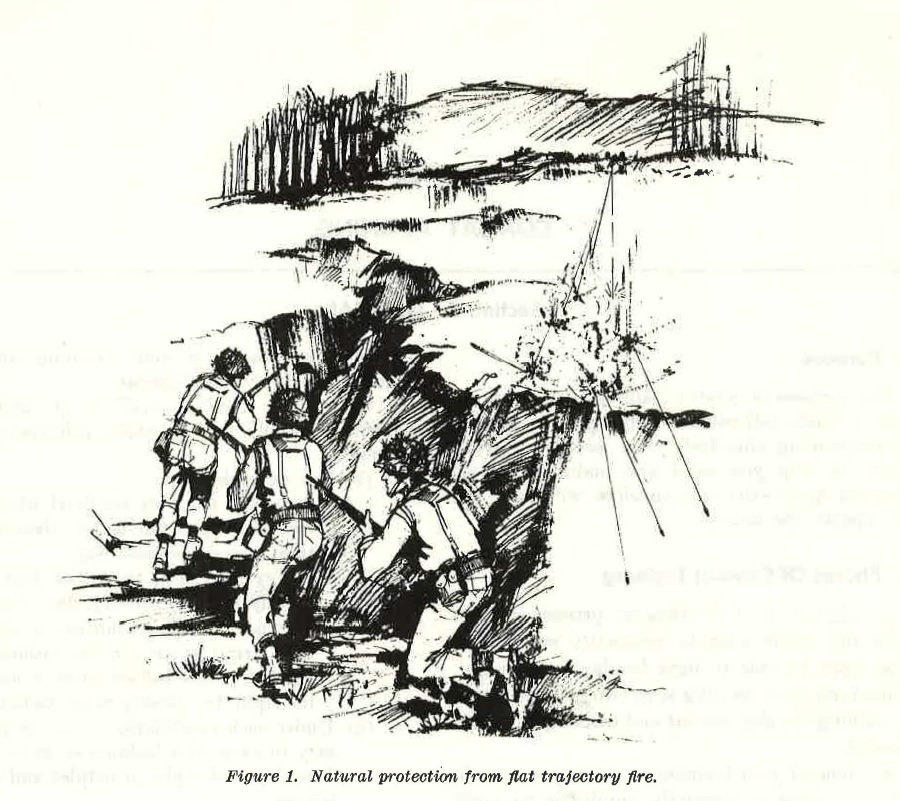
FIGURE 1. Natural protection from flat trajectory fire.
(3) Be sure to consider the effects of changes of sen,sons on the concealment provided by both natural and artHicial materials.
7. Concealing Yourself.
a. Avoid Unnecessary Movement. Remain still - movement attracts attention. You may be concerned when still, yet easily detected ii you move. Remember that movement against a stuhonnry bnckgrom1d causes you to stand out clearly. "When you must change positions, move carefully over a concealed route to the new position.
b. Use All Available Concealment.
(1) Background is important; blend with it to prevent enemy detection of your position (fig. 2). Trees, bushes, grass, earth, and man made structures forming your bnckgrom1d vary in color and appearance, makb1g it possible for you to blend with them. Selec1; trees or bushes which blend with your uniform and absorb the outline of your figure.
(2) Shadows help hide you. The soldier in the open in figure 3 stands out clearly, but the two soldiers in the shadows are difficult to see. Shadows are found under most conditions of day and night.
c. Stay Low to Observe. Observe from a crouch, a squat, or the prone position. You present a low silhouette, making it difficult for the enemy to see you.
d. Expose Nothing That Shines. Reflection of light on a shiny surface instantly attracts attention and can be seen for great distances.
e. Sleep Off the Skyline. Figures on the sky line can be seen from a great distance, even at night because a dark outline stands out against the lighter sky. The silhouette formed by your body makes a good target.
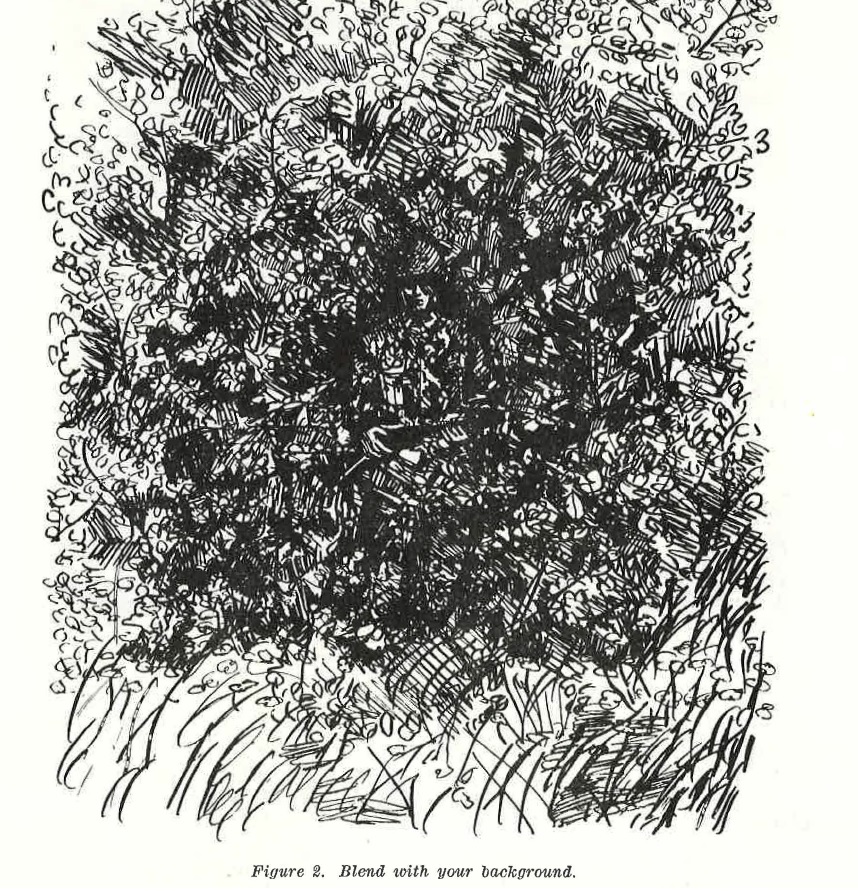
FIGURE 2. Blend with your background.
f. Altm• FanniUm outlines.
Military equipment. and the human body are familiar outlines to all soldiers. Alter or disguise these revealing shapes.
g. Keep Quiet. Noise, such as talking, can be picked up by enemy patrols or listening posts.
8. Temporary Battlefield Positions elect temporary firing or observation positions which take advantage of available cover and concealment. Study the pictures in figure 4. They show some temporary battlefield positions and emphasize that you should
a. Observe and Fire Around the Side Of An object. This conceals most of your head and body.
b. Stay Low To Observe and Fire Whenever Possible. You are a smaller target, you can aim better, and you take advantage of concealing vegetation.
c. Select a Good Background Before Observing Over The Top Of An Object. Avoid observing over the top of a ditch unless a suitable background exists.
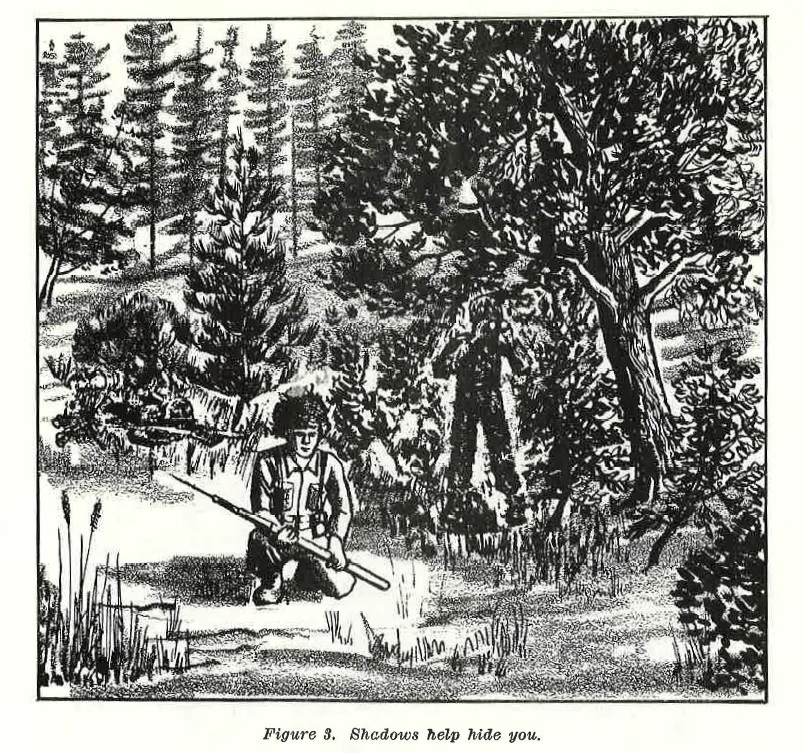
FIGURE 3. Shadow help hide you.
9. Camouflage.
a. Camouflage consists of the measures you take to conceal yourself, your equipment, and your position from enemy observation. You may use na 'uml t\n cl artificial mn,terinJs. Remember these rules.
(1) Take advantage of all available natural concealment.
(2) Alter the form, shadow, texture, and color of objects.
(3) Camouflage against ground and air observation.
b. Camouflage your position as you prepare it.
(1) Study the terrain and vegetation in the area. Arrange grass, leaves, brush, and other natural materials you use to conform to the area. For example, do not expect tree branches stuck into the ground in an open field to provide effective camouflage.
(2) Use only as much material as needed. Excessive use of material (natural or artificial) can reveal your position.
(3) Obtain your natural material over a wide area. Do not strip an adjacent area of all foliage because such bared areas attract enemy attention.
(4) Dispose of excess soil by covering it with leaves and grass or by dumping it under bushei;;, into streU)l'ls, or into ravines. Piles of fresh dirt indicate an area is occupied and reduce effectiveness of camouflage.
(5) After your camouflage is completed, inspect it from the enemy's view-point. Check often to insure it remains natural looking and actually conceals your position. If it does not look natural, rearrange or replace it.

FIGURE 4. Correct and incorrect battlefield positions.
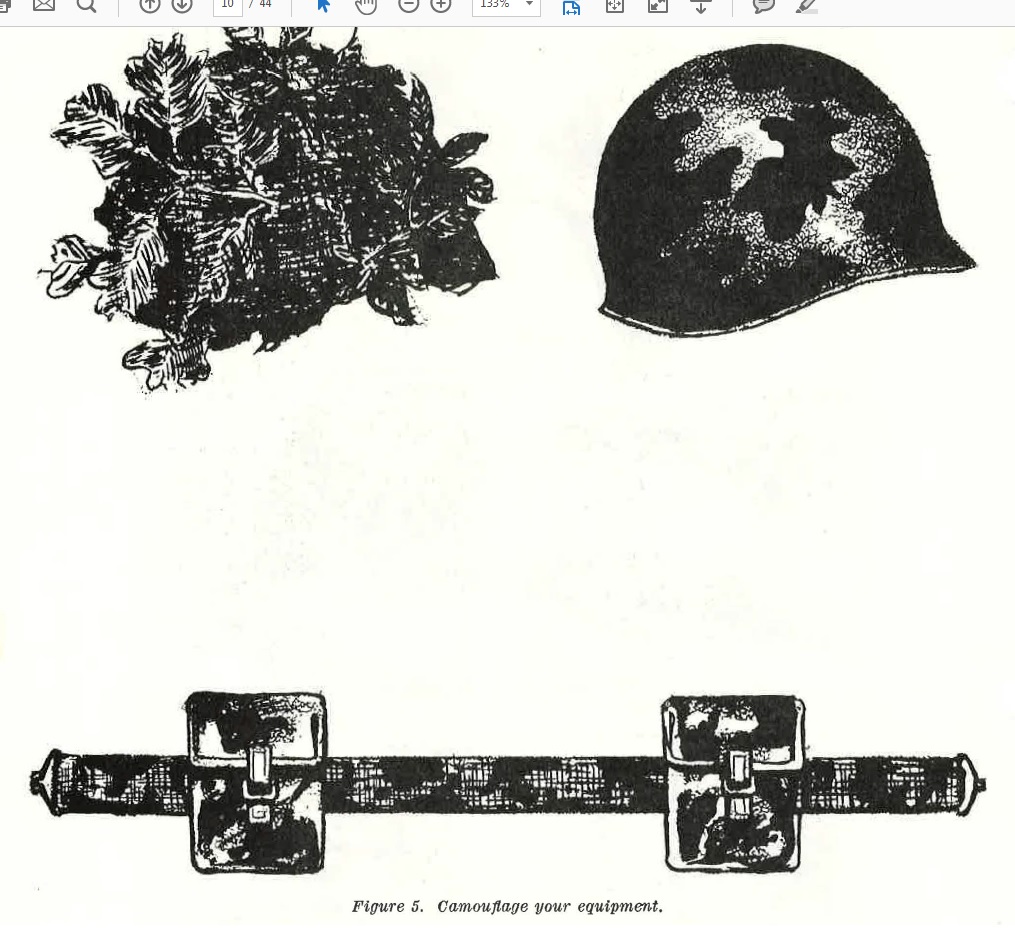
FIGURE 5. Camouflage your equipment.
(6) Practice camouflage discipline. The best camouflage fails to provide concealment if tracks lead to your position or if cans and boxes are scattered about. Every man in your unit shares this responsibility.
a. Equipment must blend with the natural background. Remember-vegetation changes color with the season.
(1) Your web equipment-pack, belt, canteen cover-blends well with most terrain unless it is badly faded. If faded, color it to blend with the surrounding terrain. If no paint is available, use mud, charcoal, or crushed grass. Remember to paint in bold, irregular patterns (fig. 5).
(2) Alter the distinctive silhouette of your helmet with a cover made of cloth or burlap colored to blend with the terrain. Let foliage stick over the edges to alter the outline-but do not use too much. If material for covers is not available, disguise and dull the surface of your helmet with irregular patterns of paint or mud. Use a camouflage band, string, burlap strips, or rubber bands to hold the foliage in place.
(3) Use mud or dirt to dull the shiny surfaces of your weapon. Be careful however, to keep the working parts clean so your weapon will function properly. Remember to dull the shine of the bayonet.
(4) Wear a snowsuit and color your equipment white when operating against a background of unbroken, snow-covered terrain.
(5) Color your equipment black or forest green when operating in the jungle.
d. Your field and work uniforms also blend well with most terrain unless they are badly faded. If your uniform is faded, camouflage it with mud, soot, paint, or dye.
e. Except for the snowsuit, there is no issue camouflage suit for unusual conditions. If a snowsuit is not available, you can make one from a sheet or mattress coyer. You can make a suit to blend with other terrain by painting an old set of fatigues or by attaching bowties of colored burlap garlands to an old set of fatigues.
f. Exposed skin reflects light and attracts the enemy's attention. Even very dark skin will reflect light because of its natural oil (fig. 6).
(1) Camouflage face paint sticks are issued in three standard two-tone sticks as follows:
(a) Loa11i cund iight g1•een for light skinned troops, in all but snow regions.
(b) Sand .atJid light (J?'een for dark skinned troops.
(c) Loam G//'l.d white for all troops in snow-covered terrain.
(2) Paint the shine areas (forehead, cl1eekbones, nose, and chjn) with a dark color. Paint the shadow n:rea.s (around the eyes, under the nose, and under the chin) with a light color. Paint the exposed skin on the back of your neck and hands. When it is available, use the issue-type face paint camouflage stick to apply a two-color combination in an irregular pattern.
(3) Burnt cork, charcoal, or lampblack can be used to tone down exposed areas of skin when issue-type face paint sticks are not available.
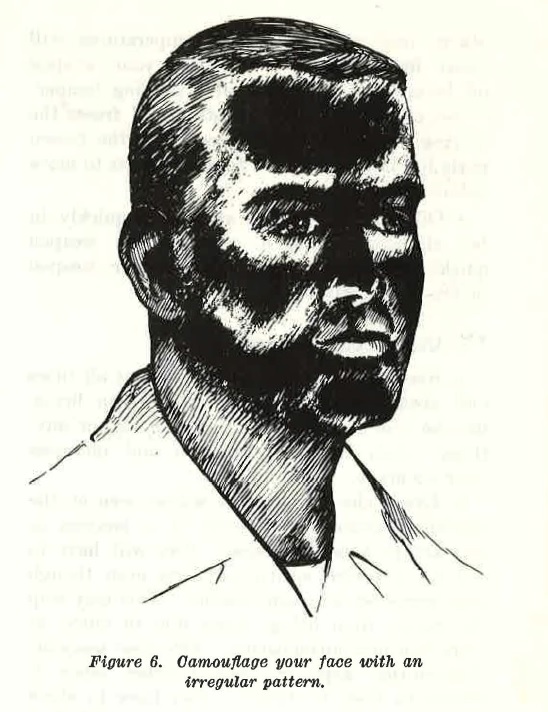
FIGURE 6. Camouflage your face with an irregular pattern.
(4) Mud may be used in an emergency. Remember that mud changes color as it dries and may peel off, leaving the skin exposed. Remember, too, that mud may contau1 harmful bacteria.
(5) When applying camouflage, use the buddy system-work with another man and check each other.
10. Care Of Your Weapon.
a. Your weapon functions best when properly maintained. Protect it from the weather; keep it free of sand, dirt, snow, or ice; do not abuse it or allow others to abuse it. Carry cleaning tools and materials and keep the working parts, sights, and bore of your weapon clean at all times.
b. In extremely cold weather your weapon can become so sluggish that it will not lire. Use very little and very light oil in such climates. A weapon taken from :freezing, outside temperatures into wanner, inside temperatures will sweat for about an hour. Dry your weapon off before taking it back into freezing temperatures or the condensed moisture will :freeze the moving parts. I£ this happens, :free the frozen parts by thawing; do not force the parts to move before thawing.
c. Oil on your weapon evaporates quickly in hot climates. Check it often-a dry weapon quickly develops trouble. Keep your weapon in the shade when possible.
11. Using Your Weapon
a. Keep your weapon within reach at all times and always be ready to use it. When firing, use the side of the building, a tree, a log, or anything which steadies your aim and increases your accuracy.
b. Exact, clear targets are seldom seen on the battlefield because the enemy is as anxious as you are to avoid detection. You will have to fire on suspected enemy positions even though you cannot see an enemy soldier. This may stop the enemy from firing force him to move, or scare him into surrendering. Fire yO'lt1' weapon Ammunition kept in your pouches when it should be fired is wasted. You have to shoot to enable your unit to move :forward and kill or capture the enemy. You must be sure, however, that you do not waste ammunition by shooting wildly.
c. Sometimes it is desirable to bring surprise fire on the enemy. In this case, hold your fire until you :lei:ed to shoot then select your own aiming points or targets within the n1·e11 assigned to you. When all men of your team do this, the initial burst is heavy and accurate.
12. Sounds and Smells.
a. Learn to identify, evaluate, and react to common battlefield noises and the common sounds in your area of operation. All of these sounds-the snap of a twig, the click of n. bolt, the rattle of a canteen, the bark of a dog, the calls or wild and domestic animals and fowls are information which may be valuable to you. You can learn a lot by Ustm'ling. Train yourself to be pn.t.ie11 t ; it m1ty be necessary to listen in complete silence for long periods. If you are wearing a hood or ear flaps, remove them temporarily to listen.
(1) Sounds can be heard better at night because there are fewer noises to interfere and because cooler, damper, night air carries sound better.
(2) Sounds can reveal your presence to the enemy. Suppress a sneeze by pressing up on your nostril with your fingers. If you start to cough, squeeze your Adam s apple slightly. If you cannot avoid sneezing or coughing, muffle the noise by burying your nose and mouth in your hands or sleeve.
b. Smells can help or endanger you. Odors from gasoline, cooking food, or burning tobacco can warn you of the enemy's presence or alert him to your presence. Avoid the use of shaving lotion, deodorant, hair oil, and scented soap. Odors from these may reveal your presence to the enemy.
13. Estimating Distance.
Two methods for estimating distance are described below. The flash and sound method is particularly useful at night. The apve(l;rar,_(Je, of objects method is more suitable for daytime nse. With practice, reasonable accuracy can be obtained with either method.
a. Flash al/'l,d ownd. Sound travels through the air at a fairly constant rate of speed, about 330 meters per second (1,100 feet). This makes it possible to estimate distance if you mm see and hear the action.
(1) When you see the flash or smoke of a weapon, or the dust it raises, immediately start counting at a rate of three counts per second. Stop when you hear the report of the weapon. The number you are com1ting when you stop is the ctpprorc:i1rw,te distance to the weapon in hundreds of meters. if you stop on the number three, the distance is about 300 meters. If you count to eight before you hear the report, the distance is about 800 meters (figs. 7 and 8).
(2) Practice counting at t1U'ee counts per second. This can be done with blank ammunition fired at known distances or by having someone time you while you count. When it is necessary to count higher than nine, start over again; counting higher numbers throws your timing off. When counting at the correct route, you count to nine five times in 1,5 seconds. Practice until your timing is correct.

FIGURE 7. Estimating distance in daytime.

FIGURE 8. Estimating distance at night.
b. Appearance of Objects.
Without realizing it, you used t.his method in everyday life. Before passing iLnother car on the highway, you estimated the distance of oncoming vehicles to determine if it was safe to pass. Your estimate was not in meters, but in terms of road space and was based on your knowledge. of the appearance and apparent size of vehicles at verifying distances. You can apply the S!i,me method to estimating distances in meters. Study the appearance of men and objects a various distances until details of size and ap1'>eart1J1 e are firmly fixed in your mind (FM 23-71).
14. Observation and Listening Posts.
a. A ground observation post (OP) is in a fixed location from which you observe the activities that occur within a particular area and provide early warning of enemy approach. The number and location of OPs established depend on the unit's mission and area of responsibility and the degree of observation permitted by the terrain and weather.
(1) Selection of an observation post.
(a) The site selected for an observation post should provide-
1. Maximum observation of the desired area.
93. Cover and concealment for the OP.
3. Concealed routes to and from the OP.
(b) Observation is the primary consideration whether or not the above conditions exist at a site.
(c) Normally, the best location for an OP is on or near the military crest of a hill. Topographical crests should be avoided because you may be sky lined when occupying the OP. You must remember that selecting a position for an OP is very similar to selecting firing positions for direct fire weapons such as the rocket launcher and recoilless rifle. It may be appropriate to establish the OP well down the forward slope when observation is restricted by the terrain.
(2) Establishment and operation of an observation post.
(a) Telephone lines are laid to an OP whenever possible and supplemented by radio. Care must be taken to insure that wire lines to the OP do not disclose its location to enemy observers. Radio antennas must be carefully positioned and concealed for th e same reason.
(b) Personnel going to and from the OP must move carefully so that movement does not reveal the location to the enemy. Separate routes to and from the OP are established. When natural concealment is not adequate, the OP is camouflaged.
(c) OPs are operated in reliefs in the same manner as guard posts. A minimum of two men is necessary for each relief. One observes while the other records and reports information observed. The observer and the recorder alternate about every 30 minutes. This is because the efficiency of an observer decreases rapidly after about 30 minutes.
b. A listening post is a position :from which you list n and observe during periods of reduced visibility •a used by darkness or weather conditions. They are positioned forward of and on exposed flanks of the unit position and generally along probable avenues of enemy approach to provide early warning as well as to listen and observe activity. Their mission will often require location in an exposed position. They are operated in reliefs except when movement to and from positions would reveal their locations or endanger the personnel. Otherwise listening posts are established and operated in the same general manner as observation posts.
a. Observation posts and listening posts should be within effective small arms range of friendly personnel and supported by other means when possible.
15. Searching Terrain
Visually search terrain in two steps.
a. Make a quick overall search for obvious targets and unnatural colors, outlines, or movements.
(1) Look straight down the center of the area you are observing, starting just in front of your position.
(2) Raise your eyes quickly to the maximum distance you wish to observe.
(3) If the area is wide, further subdivide it as shown in figure 9.
b. Next, cover all areas, as follows, first searching the ground nearest you-
(1) Search a strip 50 meters deep, looking from right to left parallel to your front.
(2) Search from left to right over a second strip farther out, but overlapping the first strip.
(3) Continue in this manner until you have studied the entire area (fig. 10).
(4) When you see a suspicious spot, stop and search it thoroughly.
16. Selecting Routes
a. You may be ordered to follow a certain route; your mission may require it; or, you may select your own route. So far as orders and missions permit, select routes by applying the following principles:
(1) Avoid known enemy positions and obstacles.
(2) Seek terrain avoiding open areas and offering the most cover and concealment for daylight movement.
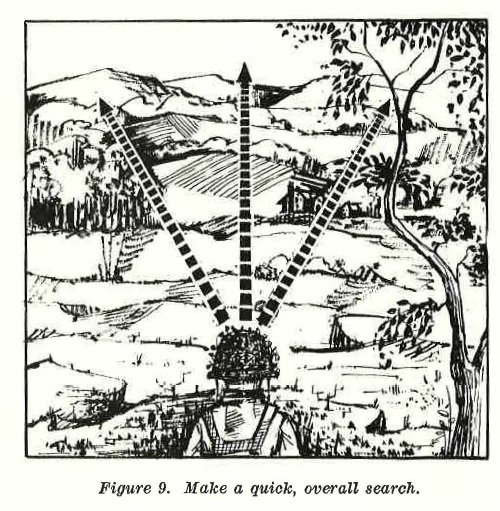
FIGURE 9. Make a quick, overall search.
(3) Seek terrain permitting quiet movement at night.
(4) Take advantage of the more difficult terrain, such as swamps and dense woods.
(5) Avoid moving along exposed ridges. Move along the slope below the ridge to prevent silhouetting yourself.
(6) Avoid using trails in guerrilla-infested areas and in the areas between forces in contact in conventiona1 operations.
(7) Avoid areas which may be mined, booby trapped, or covered by fire.
(8) Avoid villages, trails leading into villages, wells, and places where you are likely to meet natives of the area.
b. Study maps, aerial photos, or sketches and memorize your route before you start. Note distinctive features (hills, streams, swamps) and their location in relation to your route. If possible, "box" your route in with terminal features to aid in navigation.
c. Plan an alternate route to use in case you cannot use your primary route.
d. In different terrain, such as jungle or swamps, plan an offset to a known terrain feature.
17. Following Routes Keep yourself oriented at all times. As you move along, observe the terrain carefully and mentally check off the distinctive features you noted in studying and planning the route. Many aids are available to help you check and double check to insure you know where you are and where you are going. The location and direction of flow of principal streams.
b. Hills, valleys, and peculiar terrain features such as swamps and barren areas.
c. Railroad tracks, power lines, roads, towns, and other man made objects.
d. The fire of machine guns, mortars, or artillery.
(1) If you know the general location and direction of fire of machine guns, you may be able to use these fires to orient yourself.
(2) Mortar and artillery rounds fired on known locations can guide you or help you orient yourself.

FIGURE 10. Then search the terrain in overlapping strips.
(3) These fires can be fired at designated times (scheduled fires) or called for if you have communication (on call fires).
18. What to Do If Lost.
If you lose your way, do not continue until you have reoriented yourself with respect to the immediate terrain, the enemy, friendly forces, and your mission. Keep cawn and think the situation over.
a. Proper use of a map and compass, in relation to the terrain, is the best way to determine your location. FM 21-26 explains how to orient a map and compare it to the terrain it represents, both with and without a compass.
b. If you do not have a map, establish the direction in which you were traveling (with a compass, or in relation to the sun, moon, or identifiable terrain features). Mentally retrace your route, recalling hills, trails, streams, and other terrain :features you passed. If necessary, go back in the direction from which you came until you find features on which to orient yourself.
c. If you do not have a compass, use the sun, the North Star, or the constellations Cassiopeia or Southern Cross to find north (para 23 and 25). After finding north, you can move in any desired direction by remembering that, as you face north (360°) (fig. 11)
(1) Northeast ( 45 °) is to your right front.
(2) East (90°) is to your right;
(3) Southeast (135°) is to your right rear.
(4) South (180°) is to your rear.
(5) Southwest (225°) is to your le:ft rear.
(6) West (270°) is to your le:ft.
(7) Northwest (315°) is to your le:ft :front.
d. Look and listen for signs and sounds of troops, artillery, vehicles, and small arms fire. Seek the assistance of friendly troops if any are in the area.
e. As soon as you are reoriented, continue your 1nission.
19. The Challenge and Password.
a. The enemy may especially when you guerrilla operations come from any direction, are engaged in counterKeep watch in all directions. Halt and identify personnel before, they are close enough o be a danger to you (fig. 12). This precaution is even more important at night and during period, of poor visibiHty such as heavy fog.
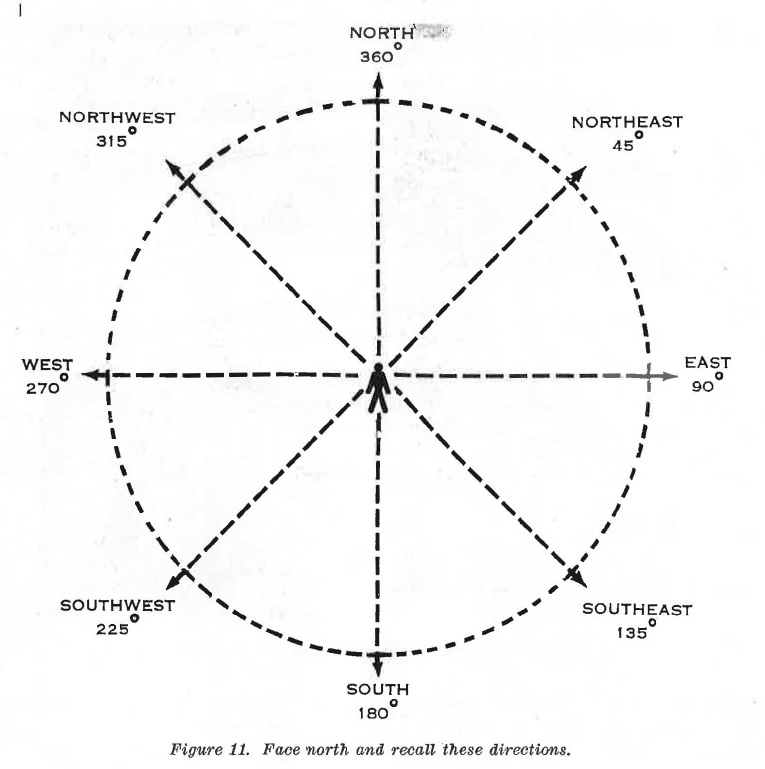
FIGURE 11. Face north and recall these directions.
b. In most cases, identity is established by proper use of the challenge and password. When you see or hear someone approaching, and do not recognize him as friendly and authorized to pass call, "Halt I" Speak clearly and just loudly enough to be ili stincHy heard. Keep him covered and do not expose yourself. When he halts, ask in a low, clear voice "Who is there?" He should reply in a low, clear voice givi11g the answer which best identifies him. For example, "Sergeant; Ole11ry, second squad," or "Private Willard, messenger. You then say, '2ld'U(mae to be recognized. :' 011titlu to keep him covered without exposing yourself. Halt him 2 or 3 meters from your position. In a low, clear voice give him the challenge; for example, "Boston." He should answer with the password; for example, "Beans." If you are not completely satisfied, require him to produce identification or question him further. Ask questions only a friendly person would be likely to know (FM22-6, STAN AG No. 2042).
c. When a group approaches and is halted, the leader should answer for the group, For example, "Friendly patrol" or "Friendly wire team." You then say, "Advance one man to be recognized." ·when the challenge and password have been given and identity is established, the other members of the group must also be identified. This can be done in two ways. Your commander should prescribe the manner to be used in your unit.
(1} The leader can vouch for the others and pass them to the flank of your position. This method reduces movement and noise at your position and helps prevent revealing your location to the enemy.
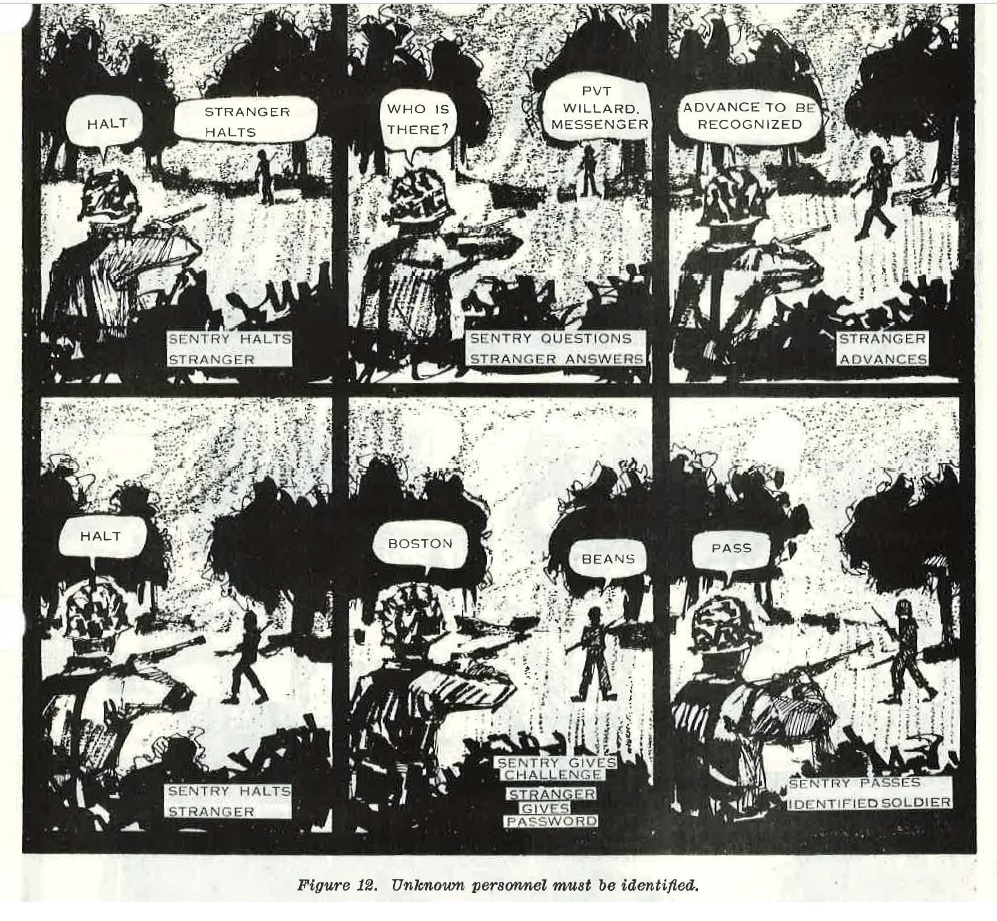
FIGURE 12. Unknown personnel must be identified.
(2) The leader, or his representative, can identify each man as he passes, notifying you when the last man has passed.
d. You may be approached by a soldier, or a group, who does not know the challenge and password. This could be the cnse of a soldier, separated from a patrol sent out by a distant unit, who has found his wri,y to your area. This could also be the case of soldiers who were isolated in the enemy area and have evaded capture and reached your area. These evaders may even be in civilian clothes. H such personnel can produce satisfactory identification, detain them netu·by where they will not be exposed, and contact your commander. If they cannot satisfactorily identify themselves, keep them covered, at a safe distance from your position, and contact your commander.
e. The challenge and password are changed every 24 hours (usually at 1200 hours) . Be sure you know the current ones. If you do not receive the new words, make a request for them.
FIGURE 12. Continued.
f. The regular challenge and password should not be used outside friendly areas. Patrols, for example, should use a different challenge and password for recognition within patrols and between patrols operating in the same general area. Words can be used in the same manner as the regular challenge and password or a numbers system can be used. For example, the challenge is a number; the password is the number which, added to the challenge, totals a prearranged odd number. If the prearranged number is 13, the challenge is any number between 1 and 12. The password is the number which, added to the challenge, equals 13. Only odd numbers should be used as the prearranged total. If even numbers are used, such as 10, someone may challenge with 5; an enemy, upon being challenged, may repeat the number spoken and be passed as having been identified.
g. The principle to remember is that a means of recognition must be established and must be properly used.
20. Reporting Information.
Your leaders need prompt, accurate information on which to base plans and decisions. All information is important, see chapters 4 and 5.
21. Silent Weapons.
It may be desirable to kill, stun, or capture an enemy soldier without alerting other enemy in the area. The bayonet, garrote (choke wire or cord), and homemade clubs are some of the weapons used for these purposes (fig. 13). Whether day or night, the successful use of silent weapons requires great skill, not only in their use, but also in quiet, careful movement.
22. Movement
a. Follow these general rules to move without being seen or heard by the enemy-
(1) Prepare yourself and your equipment (fig. 14).
(a) Camouflage yourself and your equipment.
(b) Tape your identification tags together and to the chain so they cannot slide or rattle.
(c) Tape or pad any parts of your weapon or equipment that rattle or are so loose that they may snag. Be sure that the tape or padding does not interfere with operation of the weapon or equipment.
(d) Wear soft, well-fitting clothes. Starched clothing swishes as you move and loose, baggy clothing may snag on brush. Use the thigh ties on the field trousers to take up slack and the ankle ties when you do not blouse the field trousers. Do not tie them too tightly. No other tie-downs should be used at any time. They may interfere with circulation in the legs and feet. In cold weather, poor circulation may lead to frostbite or other cold injury.
(e) Wear a soft cap, with its less distinctive outline, unless required to wear the helmet. The helmet has a distinctive silhouette and also may muffle or distort sounds, especially if there is a slight freeze.
(f) Do not carry unnecessary equipment. You cannot move rapidly when weighted down.
(2) Move by bounds; that is, short distances at a time. Halt. Listen. Observe. Then move again.
(3) Look for the next spot where you will stop before leaving the concealment of one position. Observe that area carefully for enemy activity. Select the best available covered and concealed route to the new location; take advantage of darkness, fog, smoke, or haze to assist in concealing your movement.
(4) Change direction slightly from time to time when moving through tall grass. Moving in a straight line causes the grass to wave with an unnatural motion which attracts attention. The best time to move is when wind is blowing the grass.
(5) If you alarm birds or animals, remain in position and observe briefly. Their flight or movement may attract the enemy's attention.
(6) Take advantage of the distraction provided by noises.
(7) Cross roads and trails where there is the most cover and concealment. Look for a large culvert, a low spot, or a curve. Cross quickly and quietly.
FIGURE 13. These weapons make no noise.
(8) Follow the furrows as much as possible when crawling over a plowed field. When you must cross the furrows, look for a low section in the field; crawl down a furrow to that section and make your cross-furrow movement.
(9) Avoid steep slopes and areas with loose stones.
(10) Avoid cleared areas to prevent being silhouetted. Note. The movements discussed below are described and illustrated as they would be performed by a soldier carrying his weapon in his right hand. When the weapon is carried in the left hand, designations of feet, arms, legs, and hands are changed.
b. The rush is the fastest way to move from one position to another. To rush-
(1) Start from the prone position (1, fig. 15).
(2) Slowly raise your head and select you'll next position (2, fig. 15).
(3) Slowly lower your head. Draw your arms unto your body, keeping your elbows down, and pull your right leg forward (3, fig. 15).
(4) With one movement, raise your body by straightening the arms (4, fig. 15).
(5) Spring to your feet, standing off with the left foot (5, fig. 15).
(6) Run to the new position, using the shortest route (6, fig. 15).
FIGURE 14. Prepare carefully for movement.
FIGURE 15. Rushing.
(7) Just before hitting the ground, plant both feet (7, fig. 15).
(8) Drop to your knees, at the same time sliding your hand to the heel of the rifle butt (8, fig. 15).
(9) Fall forward, breaking your fall with the butt of tJu~ 1·ille (9, fig. 15).
(lO) Shift the weight of your body to your left side with your right hand, place the 1 utt of the r iHein the hollow of your right shoulder i then l'Oll ill to a firing position (10 ru1 i 11, fig. 15).
(11) Lie as flat as possible. if you think you were observed by the enemy, move to the right or left if cover and concealment exist.
c. There are times when you must move with your body close to the ground to avoid being seen. There are two ways to do this, the low crawl and the high crawl. Use the method best suited to the conditions of visibility, cover and concealment available, and speed required.
(1) Use the low crawl when cover and concealment are scarce, when visibility permits good enemy observation, and when speed is not essential.
(a) Keep your body as flat as possible against the ground. Grasp the rifle sling at the upper sling swivel. Let the balance of the rifle rest on your forearm and let the butt of the rifle drag on the ground. Keep the muzzle off the ground (1, fig. 16).
(b) To start forward, push your arms forward and pull your right leg forward (2, fig. 16).
(c) To move forward, pull with your arms and push with your right leg.
(d) Change your pushing leo- frequently to avoid fatigue (3, fig. 16).
(2) Use the high crawl when cover and concealment are available, when poor visibility reduces enemy observation, and when you require more speed.
(a) Keep your body free of the ground and rest your weight on your forearms and lower legs. Cradle the rifle in your arms, keeping its muzzle off the ground. Keep your knees well behind your buttocks so it stays low.
(b) Move forward by alternately advancing your right elbow and left knee, left elbow, and right knee (fig. 17).
FIGURE 15.
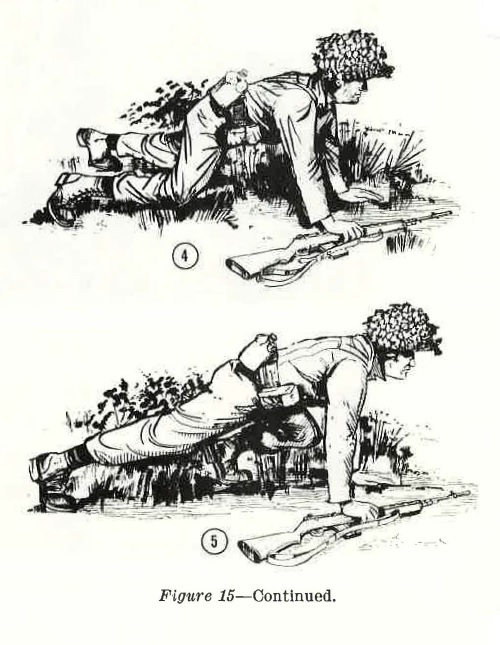
FIGURE 15. Continued.
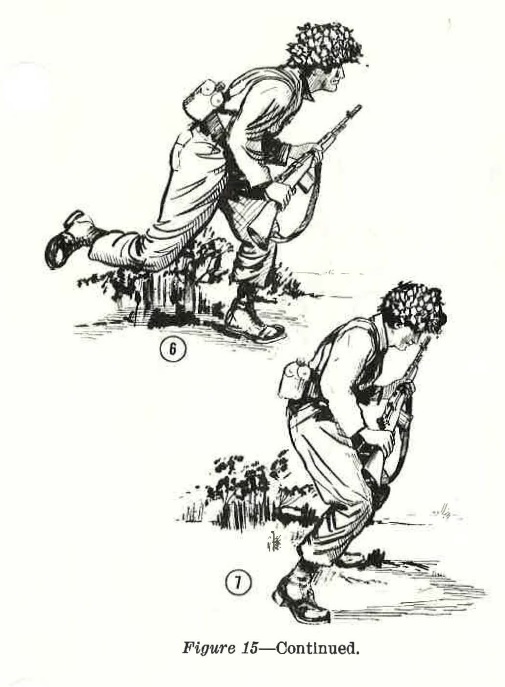
FIGURE 15. Continued.
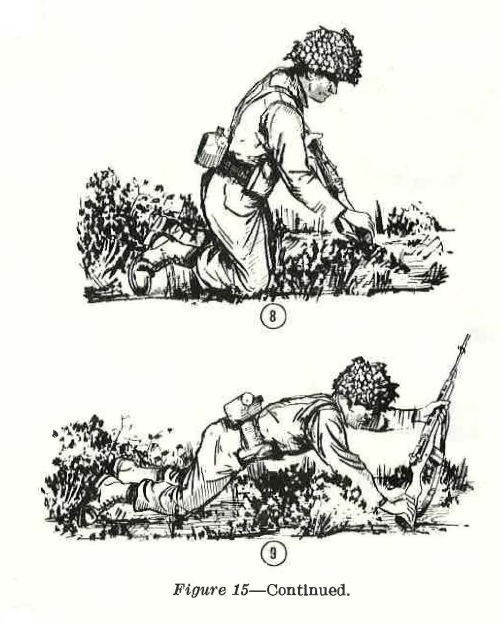
FIGURE 15. Continued.

FIGURE 16. The low crawl.
d. Use the methods explained below when extremely quiet movement is necessary, such as when your are very near the enemy. These movements m™t be ma,de slowly, are very tiring, and require great patience to perform properly.
(1) Walking (fig. 18). Hold your weapon at port arms. Make your footing sure and solid by keeping your weight on one foot as you step. Raise your other leg high to clear brush or grass. With your weight on the rear leg, gently let your foot down toe first. Feel with your toe to pick a good spot. Lower your heel after finding a solid place. Shift your weight and balance to your forward foot and continue. Take short steps to avoid losing your balance. At night, and when moving through dense vegetation, avoid making unnecessary noise by holding your weapon with one hand (in any convenient manner) and extending the other hand forward, feeling for any obstruction as you move.
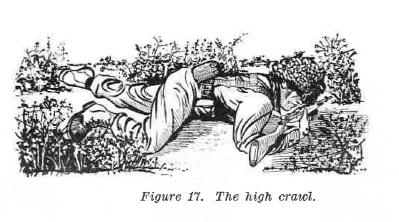
FIGURE 17.
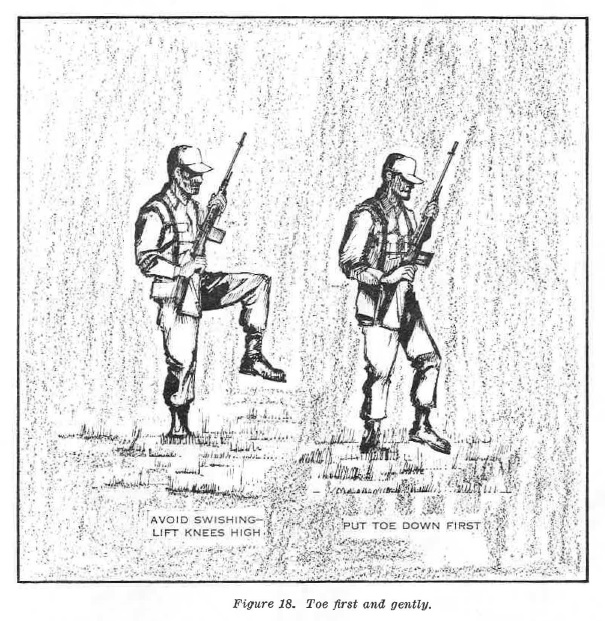
FIGURE 18.
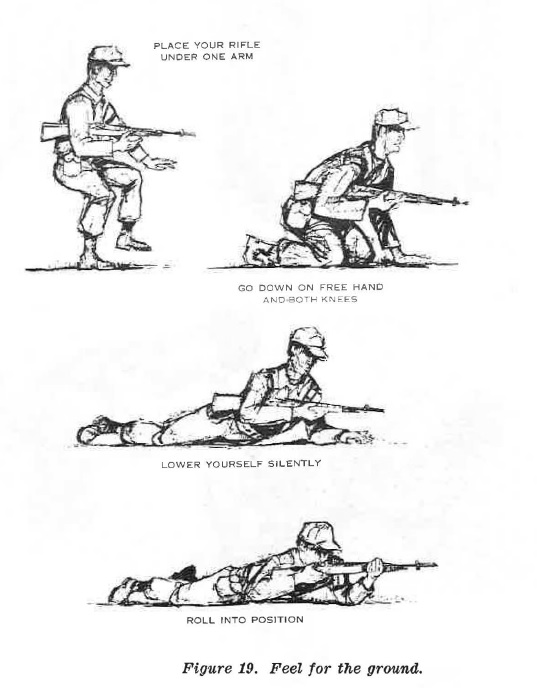
FIGURE 19.
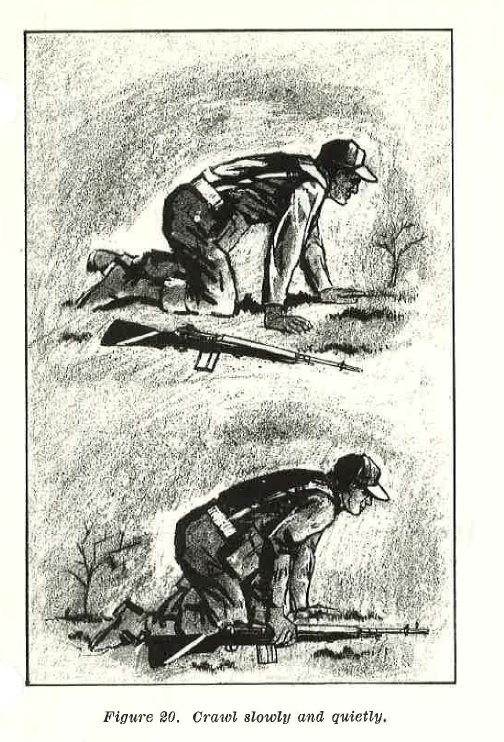
FIGURE 20.
(2) Going into the prone position (fig. 19). Hold your weapon under one arm and crouch slowly. Feel for the ground with your free hand and make sure it is clear. Lower your knees, one at a time, until your weight is on your knees and free hand. Shift your weight to your free hand and opposite knee. Raise your free leg up and back and lower it gently to the ground, feeling with your toe for a clear spot. Roll gently to that side and move your other leg into position the same way. Roll quietly into the prone position.
(3) Crawling (fig. 20). The low crawl and high crawl are not suitable when you are very near the enemy. They make a shuffling noise which is too easily heard. Craw1 on your hands and knees. Lay your weapon on the ground by your side. With your right hand, feel for or make a clear spot for your knee. Keep your hand on the spot and bring your right knee forward until it meets your hand. Clear a spot with your left hand and move your left knee up in the same way. Be sure your weapon is always within reach! To move your weapon, feel for a place, clear it, and lift the weapon into position. Crawl very slowly and keep your movements absolutely silent.
SECTION III. DAY COMBAT.
a. General. If you do not have a compass, you can use the sun to find approximate true north (and from north, any other direction). The method explained below can be used any time the sun is bright enough for a stick placed in the ground to cast a shadow.
b. Find a fairly straight stick about 3 feet long and follow these steps-
Step 1. Push the stick into the ground, at a level spot, so that it is straight up and down. Notice that the stick casts a shadow (1, fig. 21). Step 2. Mark the tip of the shadow with a small rock and wait until the shadow moves a few inches, 10 to 15 minutes ( 2, fig. 21). Step 3. Mark the tip of the second shadow (3, fig. 21). Step 4. Draw a line from the first rock to the second rock and about a foot past the second rock ( 4, fig. 21).
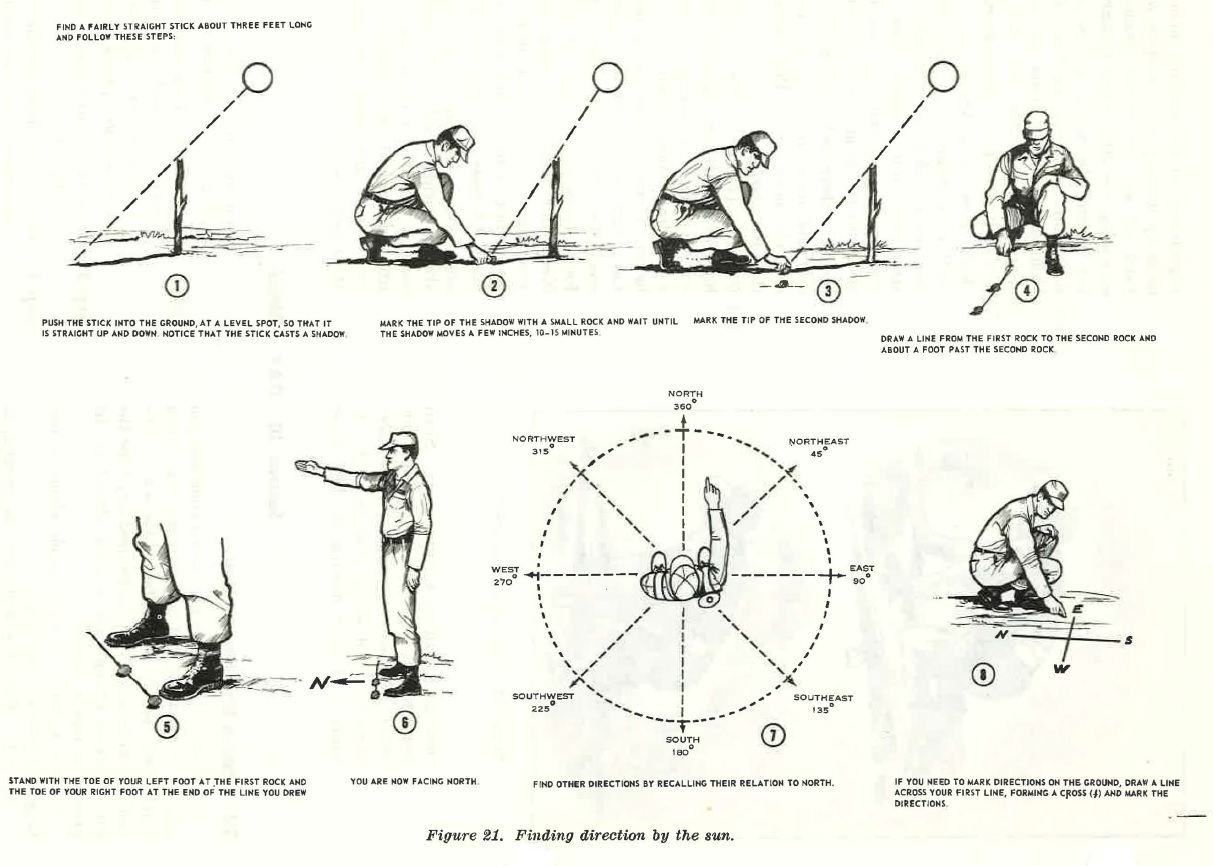
FIGURE 21. Find direction by the sun.
Step 5. Stand with the toe of your left foot at the first rock and the toe of your right foot at the end of J the line you drew (5, fig. 21).
c. YOU ARE NOW FACING NORTH (6, fig. 21) . Find other directions by recalling their relation to north ('7, fig. 21). If you need to mark directions on the ground ( as for the purpose of orienting others), draw a line across your first line, forming a cross ( + ) and mark the directions (8, fig. 21).
d. See appendix D for more information on finding direction by the sun and for information on finding time by the sun.
SECTION IV. NIGHT COMBAT.
24. Movement
Usually you must move more quietly at night than in day. Here are some general rules to help you. Move around thick undergrowth, dense woods, and ravines. Your field of observation is reduced and it is difficult to move quietly.
b. Move as quickly as circumstances allow, but avoid running if possible. You may fall or make unnecessary noise.
25. Finding Direction By Night.
If you do not have a compass, you can find direction by other methods.
a. The North Star.
North of the equator, the North Star shows you true north (fig. 22). To find the North Star-
(1) Look for the Big Dipper. The two stars at the end of the bowl are called the "pointers." In a straight line out from the pointers is the North Star (at about five times the distance between the pointers). The Big Dipper rotates slowly around the North Star and does not always appear in the same position (1, 2, and 3, fig. 22).
(2) You can also use the constellation Cassiopeia.
This group of five bright stars is shaped like a lopsided M (or vV, when it is low in the sky). The North Star is straight out from the center star about the same distance as from the Big Dipper. Cassiopeia also rotates slowly around the North Star and is always almost directly opposite the Big Dipper. Its position, opposite the Big Dipper, makes it a valuable aid when the Big Dipper is low in the sky, possibly out of sight because of vegetation or high terrain features.
b. The Southern Cross.
South of the equator, the constellation Southern Cross helps you to locate the general direction of south and, from south, any other direction. This group of four bright stars is shaped like a cross that is tilted to one side. The two stars forming the long axis, or stem, of the cross are called the "pointers." From the foot of the cross, extend the stem five times its length to an imaginary point (fig. 23). This point is the general direction of south. From this point, look straight down to the horizon and select a landmark.
c. Flares, Tracers, Searchlights. You can arrange for or call for-
(1) Flares to be fired over a known position. vVhen one is fired, orient yourself quickly because flares drift with the wind. Be sure you are in a concealed position before the flare bursts.
(2) Tracers to be fired on a certain azimuth at a specified time.
(3) A field artillery searchlight to indicate direction. The beam can be laid on specified azimuths or used to illuminate specific points.
26. Security.
Darkness provides a great deal of protection. Use these hints to gain greater security:
a. Know and use the challenge and password (para 19).
b. Use the buddy system-work with another man.
c. Rotate watch and rest periods with your buddy.
d. Keep all light concealed. A lighted match is visible for a great distance. If light is necessary, use a flashlight with a filter under a poncho.
e. Make maximum use of hand grenades. They are an area weapon and do not reveal your location.
f. When moving, watch and feel for tripwires.
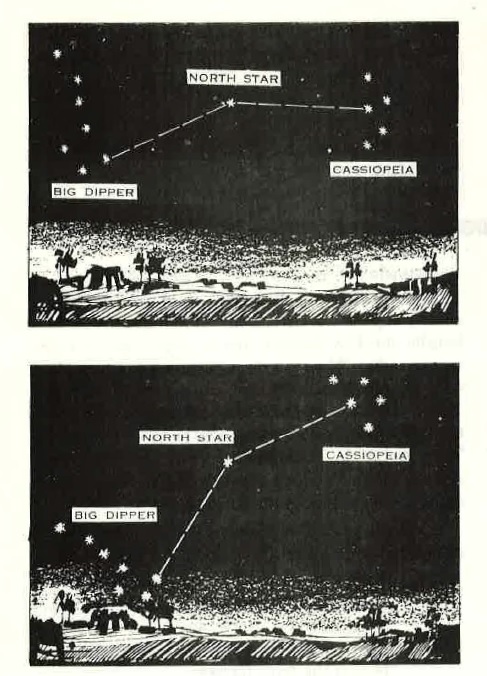
FIGURE 22. Locating the North star.
g. Keep quiet. Do not reveal your location by talking and unnecessary sounds.
27. Actions Under Flares.
There are two general types of flares: ground flares which burst and burn in place, and over head flares which burst and burn high in the sky.
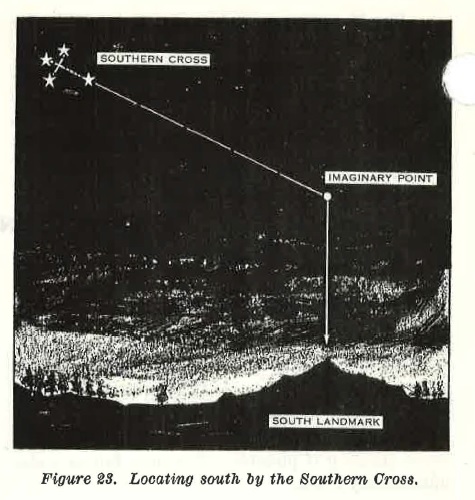
FIGURE 23. Locating South by the Southern cross.
a. Ground flares are placed in the same manner as anti-personnel mines, so you will set them off or the enemy can set them off by pulling wires. The areas in which they are placed are often under enemy observation and fire. A ground flare set off nearby usually means the enemy has seen you or suspects your presence.
(1) If caught in the light of a ground fiare, move quickly out of the lighted area.
(2) Keep moving until you are well away from the area, reorient yourself, and continue the mission.
b. Overhead flares may be placed and set off in the same manner as ground flares or may be fired from rifles, mortars, artillery, or hand projectors, or may be dropped :from aircraft. Except for those dropped from aircraft, a.D .L'ise high m th · air before bursting and burning.
(1) If you set off an overhead flare or hear one fired, get down while it is rising and conceal yourself before it bursts.
(2) If caught in the light of the burst where you blend well with your background, freeze in place until the flare burns out.
(3) If among trees, step quickly behind one.
(4) If caught in the open, crouch low or hit the ground. The burst of light is temporarily blinding and may prevent from being seen (fig. 24).
o. If caught by a flare while crossing an obstacle, such as barbed wire, crouch low and stay still until the flare burns out.
d. Continue the mission as soon as the flare burns out and night vision is regained.
e. If caught by a flare during an assault, continue the assault.
FIGURE 24. Crouch low or hit the ground if caught in the open.
28. Crossing Danger Areas.
A danger area is any place where you may be exposed to enemy observation or fire. Some danger areas you may have to cross are open areas, roads and trails, native villages, enemy positions, and obstacles such as minefields, streams, and barbed wire. A void danger areas whenever possible. If you must pass or cross them, use great caution.
a. Open Areas.
Conceal yourself on the near side and carefully observe the area. If the distance is short, cross on the double.
b. Roads and Trails.
Cross a road or trail at or near a bend or where the road is narrow so the enemy's observation is limited and you will be exposed as short a time as possible (para 22).
a. Native Villages.
Pass on the downwind side, well away from the village. Near farm villages, avoid animals, especially dogs, which may· betray your presence.
d. Enemy Positions.
Pass these on the downwind side; also, they may have scout dogs. Be alert for tripwires and warning devices.
e. Minefields.
Be alert for minefields and avoid them whenever possible, even if it means going a considerable distance out of your way. Routes of approach, ditches, and the banks of streams are frequently mined and must be carefully checked. If you must pass through an area which has been mined, use extreme caution and work your way through slowly. Use your hands to detect tripwires and probe gently with your bayonet for buried mines. For additional information on mines, see FM 20-32.
f. Streams.
Select a spot where the stream is narrow and there is concealment on both sides. Observe the far side carefully before crossing. Cross rapidly but quietly.
g. Barbed Wire.
Stay low when approaching wire. At night, silhouette the wire against the sky and figure out its design. Check for mines, booby traps, and warning devices. In day, cross in the manner which will expose you the shortest time. At night, follow the procedures described below.
(1) To go over the wire (fig. 25)-
(a) Grasp the first strand lightly and cautiously lift one leg over. Lower your foot to the ground, feeling carefully for sure footing. Lift your other foot over the wire. Quietly release the wire and feel for the next strand. Cross it in the same manner.
(b) You may be able to pass over wire by putting a wood or grass mat or chicken wire netting over it. Cross slowly because such a mat or net forms an unstable path.
(2) To go under the wire (fig. 25), go through head first. Slide under the bottom strands on your back, pushing yourself forward with your heels. Carry your weapon lengthwise on your body. Steady it with either hand. Let the wire slide on the weapon to prevent the wire from catching on clothing or equipment. Inch your way along, holding the wires up with one hand. Do not pull or jerk on the wires. Feel ahead as you move there may be low strands or tripwires.
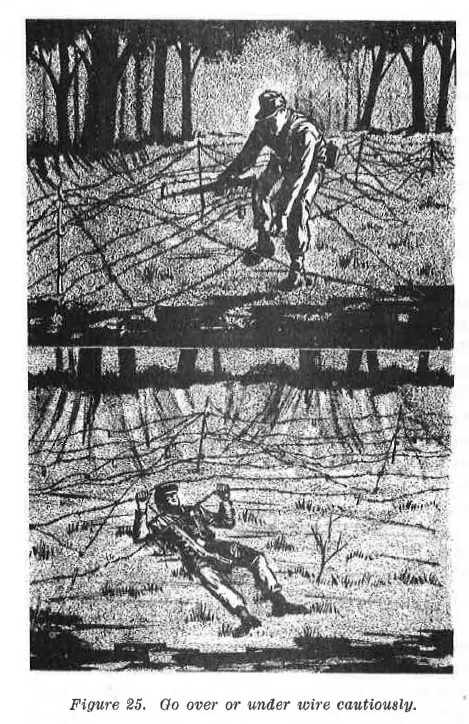
FIGURE 25. Go over or under the wire cautiously.
(3) If it is necessary to cut your way through wire (fig. 26), cut only the lower strands and leave the top wire in place. This makes it less likely that the enemy will discover the gap. Cut the wire near a picket. When someone is with you, have him hold the wire with both hands. Wrap cloth, such as rifle patches, around the wire between his hands and cut part way through the wire. Quietly bend the wire back and forth until it separates, then bend back the loose ends. When you are alone, wrap the wire, hold it, then cut nnd bend between your hand and the picket. Carefully roll back the loose end to clear your path.
Do not cut concertina if there is any way to bypass it. Most concertina is like a spring and is under tension between stakes or pickets. It is very difficult to control after cutting and may snap back noisily and reveal your presence. If you must cut your way through concertina, stake down two loops far enough apart so that you can crawl between them; then cut the wire as described above. The two stakes will prevent the wire from snapping back.
29. Firing
a. The technique of night firing is a pointing method looking over the top of the barrel with your head held high and both eyes open during all conditions of visibility. Under conditions of very high illumination, the mass of the sights may be seen well enough to improve your alignment (FM 23-71).
b. You may be able to locate enemy positions by having one or two men move off to one side and fire a few rounds to draw the enemy's fire. The enemy may use the same technique against you. Do not fall for this trick. In a defensive situation, fire when you detect the enemy, whether he is firing or not. In an attack, fire only after the enemy detects and fires at you unless you receive other orders.
c. Use hand grenades where possible. Their radius of burst makes them effective against uncertain targets and they do not disclose your position.
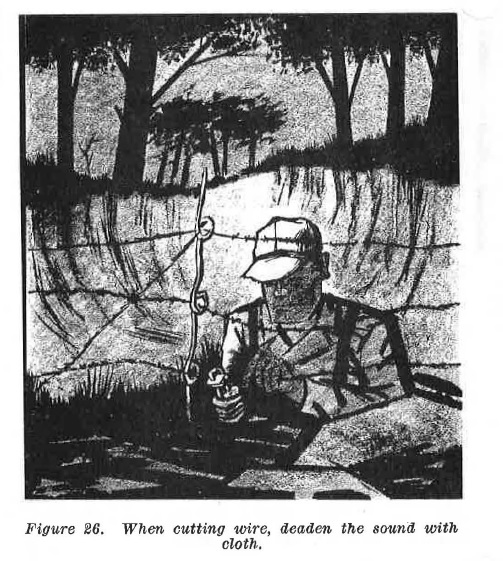
FIGURE 26. When cutting wire, deaden the sound with a cloth.
SECTION V. NIGHT VISION.
30. You Can See at Night.
You can see much more in the dark than you realize. However, to take maximum advantage of this ability, you must understand how your eyes are constructed and how to use them to see best under conditions of poor visibility.
31. Your Eyes Are Like a Camera.
Certain parts of your eyes correspond to parts of a simple camera (fig. 27).
a. The lens focuses light entering the eye just as does the lens of a camera.
b. The iris corresponds to the diaphragm of a camera, opening and closing to regulate the amount of light entering the eye through the pupil.
c. The retina corresponds to camera film.
Light rays strike the retina, form an image, and cause an impression to be transmitted to the brain through the optic nerve. The brain tells us what we see. In a camera, the image is :formed and fixed on the film.
32. Day and Night Eyes.
The retina is composed of cone cells and rod cells, so-called because of their shapes.
a. Some cells enable you to see color, shape, and sharp contrast. A great deal of light is required to activate them and they are blind during periods of low illumination. For this reason, they are your day eyes. The cone cells are concentrated in the cone region, directly behind the lens, and decrease in number with distance from the center of the cone region.
b. Rod cells produce a chemical substance called visual purple which makes them active in darkness or periods of low illumination. They are your night eyes. Rod vision enables you to distinguish black, white, and shades of gray and to distinguish general outlines. Most of the rod cells are in the area of the retina around the cone region. A few are in the cone region.
33. Seeing At Night.
Using your eyes effectively at night requires the application of the principles of night vision dark adaptation, off-center vision, and scanning.
a. Dark adaptation means allowing your eyes to become accustomed to low levels of illumination. It takes about 30 minutes for the rod cells to produce enough visual purple to activate them an enable you to distinguish objects in dim light. This may also be accomplished by staying in a red-h~hted area, or by wearing red goggles for 20 minutes, followed by 10 minutes in darkness (to allow the pupils to open wide). This method may save valuable time by allowing you to be in hghted area to receive orders, check equipment, or perform some other function before moving into darkness.
b. Off-center vision is the technique of keeping your attention focused on an object without looking directly at it. When you look directly at an object, the image is formed on the cone region (fig. 28) which is not sensitive at night. When you look slightly to the left, right, above, or below an object, the image is formed on the area of the retina containing rod ceUs ·which are sensitive in darkness. The most sensitive area varies in individuals, but usually is found by looking 6° to 10° away from an object (fig. 29). In effect, you look out of the corner of your eye.
c. Scanning is using off-center vision to observe an area or an object. When you use rod vision the visual purple in the rod cells being used bleaches or blacks out in 4 to 10 seconds and the object observed disappears. As the visual purple in the rod cells in one area bleaches out, you must shift your eyes slightly so fresh rod cells are used. Move your eyes in short, abrupt, irregular movements over and around your target, as shown in figure 30. Concentrate your attention on the target, but do not look directly at it. Pause a few seconds at each point of observation because your eyes cannot see while in motion.
34. Factors Affecting Night Vision.
Visual purple is chemically related to vitamin A, and serious lack of vitamin A impairs your night vision. However, excessive amounts of vitamin A will not necessarily improve your night vision. Colds, headaches, fatigue, narcotics, heavy smoking, and excessive use of alcohol reduce your ability to see at night. Exposure to bright light for extended periods impairs both day and night vision.
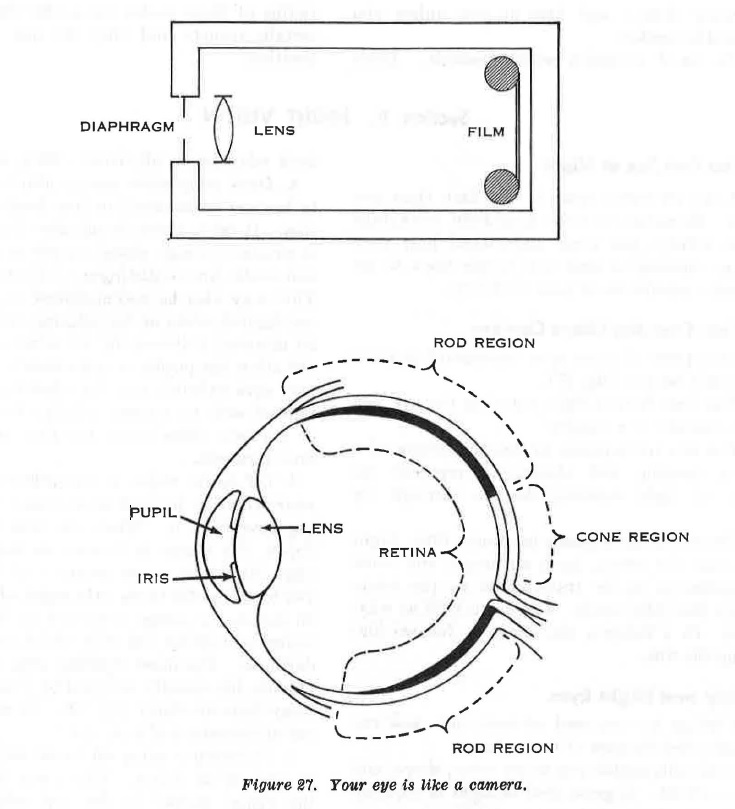
FIGURE 27. Your eye is like a camera.
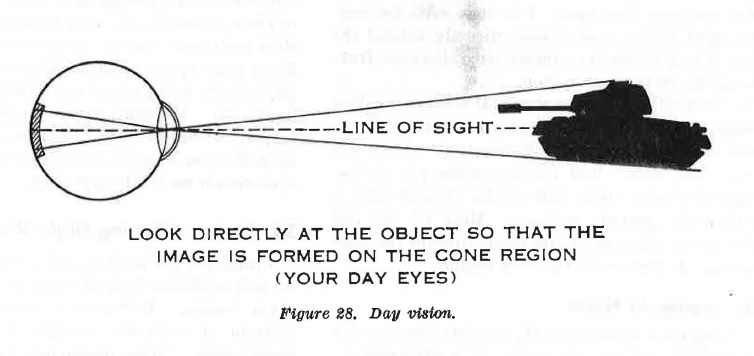
FIGURE 28. Day vision.
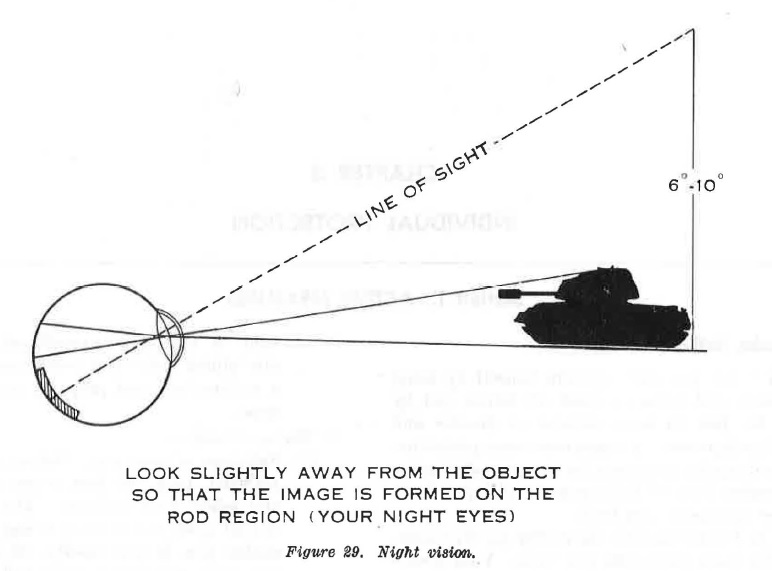
FIGURE 29. Night vision.
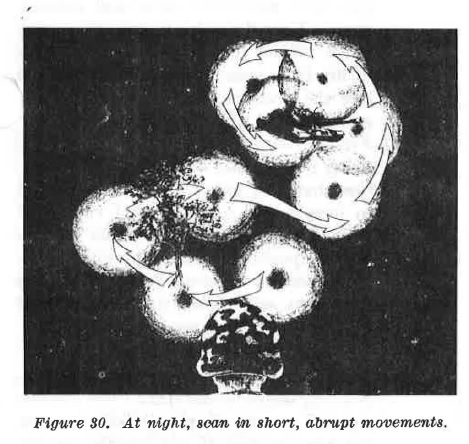
FIGURE 30. At night, scab in short, abrupt movements.
35. Preserving Night Vision.
Night vision is quickly destroyed if bright light is allowed to enter the eye. I£ this cannot be avoided, such as when you must enter a lighted area or observe in a temporarily lighted area, close and cover one eye to preserve the night vision in that eye. When the light goes away, or you leave the lighted area, the night vision retained by your protected eye enables you to see until the other eye becomes adapted to the darkness.
36. Confidence.
Confidence is very important. You usually use your eyes where there is plenty of light so you are used to sharp outlines and bright colors. In darkness, objects are faint, have no sharp outlines, and little or no color. You must believe what your eyes tell you. Gain confidence by faithful practice in using the principles of night vision.