Donate
Donate to Us.
| SECTION I | ---------------------------------- | ACTIVE MEASURES |
| SECTION II | ---------------------------------- | PASSIVE MEASURES |
| SECTION III | ---------------------------------- | HEALTH AND HYGIENE IN COMBAT |
SECTION I. ACTIVE MEASURES.
37. Take Active Measures
a. A boxer partially protects himself by using his hands and arms to ward off blows and by using his feet to move around to deceive and evade his opponent. He gets even more protection by attacking his opponent, by aggressively boring in-keeping him off balance and so busy defending that he cannot fight back.
b. The harder you hit the enemy on the battlefield, the more protection you have. Your means to destroy the enemy are also your means of self protection. Do correctly what you have learned in the individual training of the combat soldier and you automatically have great collective and individual protection.
38. Active Individual and Unit Protective Measures
a. Aggressive Spirit and Teamwork.
(1) Aggressiveness. Aggressive action by you and your fighting team tends to catch the enemy off guard and lessens his chances to plan and prepare to deal with you.
(2) Versatility. -React quickly and effectively to any new method or technique the enemy develops. Learn to expect unfavorable conditions and be prepared to deal with them.
(3) Teamwork.
Strive to improve and develop your skill and add to the skill of your team. A team is only as effective as its individual members. Learn the jobs of other members of your team and be prepared to substitute for them at any time. Have confidence in your ability, the ability of your team, and your equipment, remember, success on the battlefield is the direct result of a well disciplined individual being a member of a well-trained and properly coordinated team.
b. Firing Positions.
(1) Selection of posit-ions. Before you move forward, pick the best cover available and select your position. The position should give you a good firing position, enable you to fire readily, and provide you with maximum cover and concealment. Your fire helps to keep the enemy fixed. When you do not fire, the volume of fire from your unit is reduced and you lose the protection it provides (para f and fig. 4).
(2) Firing from covered positions. A covered firing position not only gives you protection, but also gives you an opportunity to increase the accuracy and volume of your fire. Learn to fire from various covered positions while exposing a minimum portion of your body. The less the enemy sees of you, the less chance he will have of hitting you.
c. Maintaining Contact and communication.
(1) A battlefield is often a scene of isolation. Nothing seems to move and there are few signs of action. You may feel that you, too, are isolated if you cannot see the other members of your squad or unit. Know the location of the men around you and the position of your unit leader. Know what they are doing. You fight better when you know you are backed up by the rest of your team. If you lose contact, think clearly and reestablish contact with your unit as quickly as possible.
(2) Know and use the identification or recognition system established in your unit.
(3) By maintaining contact, you develop a feeling of unity with those around you. It is possible to keep in contact by sight alone, but talking to people around you is sometimes best. The sound of a human voice increases your sense of security and adds to your confidence. You learn their situation and their intentions, and they learn yours. Be very careful in talking. The sound of voices may enable the enemy to locate your position.
(4) When your presence or the presence of your unit is unknown to the enemy, pass on commands by whispering. In doing so, expel a portion of your breath and whisper into the other man's ear. If the enemy discovers you, pass on all orders in a normal tone of voice. At such a time, speed is essential and clearly understood orders are necessary.
d. Weaknesses of Enemy Tanks.
(1) The presence of enemy tanks presents a real and psychological threat, but they have definite limitations which make it possible for you to destroy them. The tank's ability to maneuver is limited in built-up areas, defiles, swampy and mountainous country, forests, and during darkness, rainy weather and in heavy snow. Individual tanks not protected by infantry or other tanks are i~eal targets for tank-hm1ter teams. Having relatively thin armor on the sides, rear, and bottom, they are extremely vulnerable to fire on these surfaces.
(2) Small arms fire on a tank forces it to "button up." This limits visibility and maneuverability. Tanks have blind spots, especially on the sides and the rear when buttoned up. You can move in under the cover of fire from your unit to take advantage of these blind spots and to employ your anti-tank weapons against the sides or rear. You may !mock them out or immobilize them by placing explosives on or between their tracks. Once the tank is immobilized, the tank crew is at your mercy. Learn the capabilities and limitations of the enemy's tanks, seek out weak spots, and take advantage of them. The aggressive, well-trained individual or small unit presents a threat to any enemy tank.
e. Supporting Fires, Fire Superiority, Movement, and Assault.
(1) Supporting fires.
Fires from artillery, recoilless rifles, mortars, and other supporting weapons also provide protection. They neutralize the fires of enemy supporting weapons and keep enemy troops from firing at you. Move forward under the protection of these fires, but do not expect them to do your job. Be prepared to adjust supporting fires if you have communication with them. Often you may be in a better position to observe the strike of supporting fires than the observer for those weapons. Your ability to communicate with supporting units and adjust their fire adds to their effectiveness. Your fire is needed also. It is under the protection of all fires together that you close with and kill or capture the enemy.
(2) Fire superiority.
The more accurate your fire, the less chance the enemy has to fire back. If your bullets are hitting the enemy or cracking near his ears, he is less likely to raise his head to even look for you. Use your weapon skillfully to produce, along with others near you, a heavy volume of accurate fire. When this volume of fire fixes the enemy, inflicts casualties, or causes him to cease or slacken his fire, you have fire superiority. Once you have this fire superiority, maintain it; it protect you by preventing the enemy from firing accurately at you.
(3) Movement.
Fire superiority and movement go hand-in-hand. (See FM 23-12 for squad techniques of fire and movement.) When you move forward. continuously, rapidly, and aggressively, your chances of becoming a casualty are less. You catch the enemy by surprise and in a dazed condition from your supporting fires. The fire superiority your unit builds up protects you as you move forward. Look for ground ahead of you from which your fire will be most effective. Move so you can get close to the enemy and fire with increased effectiveness. Sometimes the very act of moving gives yon protection, since the enemy often adjusts his fires on the spot where he last saw you. If you have moved from an area, his fire in that spot cannot hurt you. If you are caught in mortar or artillery fire, the surest way to get out of it is to continue your advance through or around the impact area. The enemy cannot adjust his fires as quickly as you can move.
(4) Assault.
When the fires of the attacking echelons have eliminated or neutralized effective enemy fire, assault fire techniques are employed. You close with the enemy, moving rapidly, firing well directed shots either from the shoulder or underarm position at locations in your zone 0.f advance that could conceivably contain an enemy. When the enemy exposes himself or a definite target appears, you must fire a well-directed shot. Regardless of whether you fire from the shoulder or underarm position, it usually will be necessary to pause in order to insure a well-directed shot (FM 23-12). This phase of the assault is characterized by the volume and accuracy of fire and violence of actio;.1. It is designed to kill and demoralize the enemy and keep him down in his hole until you can close with and kill or capture him.
SECTION II. PASSIVE MEASURES.
39. What You Must Do to Protect Yourself.
a. You May Stay in One Position for Some Time. If your unit is halted for an extended period, protect yourself against enemy action. Keep abreast of the situation, and pass on all information you receive. Prepare positions which protect you against air, ground, and chemical, biological, and radiological ( CBR) attacks. Apply all the principles and techniques of camouflage and concealment during daylight hours as well as at night. Keep equipment issued for the construction of positions in first-class condition; turn it in for exchange if it becomes unserviceable. A void being caught short. due to negligence on your part.
b. Role of the Individual in a Particular Operation.
(l) Security. Security prevents surprise and permits freedom of movement by members of your unit. Establish security immediately.
(2) Construction. Begin the construction of your position as soon as possible, whether in an assembly area or a forward defensive position. The improvement of your position continues until your unit leaves the area. Security may require you to do a great deal of work on your position during hours of darkness.
(3} Coordination and communication. Check with the men on your right and left. Exchange information with them. Be sure to assist them and arrange for them to assist you. Coordinated efforts help to accomplish your mission.
40. Fighting Emplacements
a. Techniques of Digging In, Construction, concealment, and Improvement.
(1) Siting. Site your position to provide the best field of fire, and natural drainage, if possible. Take advantage of available natural camouflage to reduce construction effort.
(2) Construction.
(a) Equipment.
The first step in a good plan for constructing a position is a consideratio1t of your tools. What tools are required and what are available 1 An entrenching tool is issued to each soldier, but if necessary you can use a helmet or a bayonet. Keep your entrenching tool clean, sharp, and as dry as possible. With it you can dig, soften, or break hard ground, and clear brush for your field of fire. Shovels, axes, picks, and saws may be issued to you to clear firing lanes in heavy woods, to cut logs for overhead cover, and to cut saplings to strengthen the sides of your - position. Enemy equipment and material may be available. During cold weather, demolitions may be provided to break up frozen soil.
(b) Concealment of fresh soil (fig. 31).

FIGURE 31. Conceal fresh soil.
The plan for your position must include ways to dispose of the soil. Part of it can be used if you make a parapet or ridge of earth around your position. First, slice off and set aside the topsoil and grass. With fresh soil build a parapet all around the position 1-meter wide (3 feet), packing it well until it is 15 centimeters high ( 6 inches). Cover it with topsoil and grass to hide its lighter color. This parapet will help protect you from small arms fire and will help prevent water draining into your position. A parapet will cause both you and your position to extend 15 centimeters above ground level. This may reduce the effectiveness of surrounding, natural camouflage and must be considered. For recoilless weapons positions, make a parapet only on the front and sides so that the weapon's back blast will not be deflected. Use the remaining soil to make an overhead cover or remove it it in a sandbag or shelter half and dump it under bushes, in a stream, or in a ravine, well away from your position.
(c) Drainage.
Provide for drainage by sloping the bottom of the hole so water flows to a place where it can be bailed out with a helmet. In 1- and 2-man foxholes or in cave holes, dig a sump for drainage-a small hole at the bottom of the position about 60 centimeters (2 feet) long, 45 centimeters (18 inches) wide, and 30 centimeters (1 foot) deep. Slope the bottom of the sump.
Drainage is easy in sandy soil but not in clay. When it rains, creek banks and low level ground will flood; avoid these areas if possible. A spot with a gentle slope is best. Dig a trench around your position on the uphill side to carry surface water away. When building the parapet, make the inner edge higher than ground level. From the inner edge it slopes outward toward the ground. Finally, when building overhead cover, include any waterproof material you can find-sheets of metal, doors, roofing paper, or your shelter half.
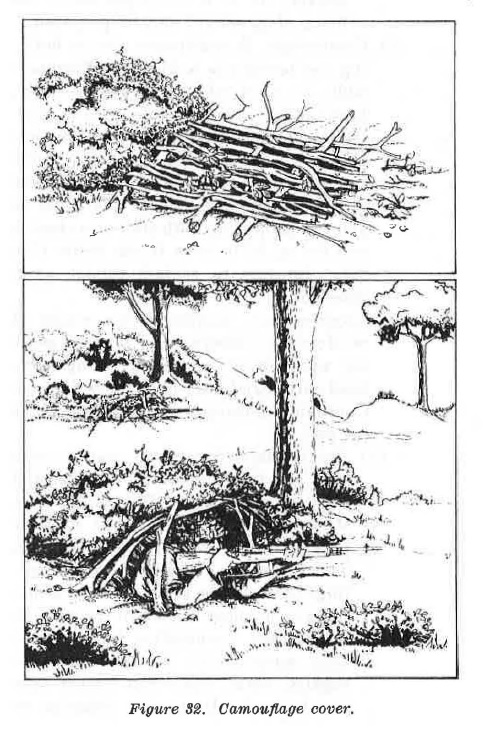
FIGURE 32. Camouflage cover.
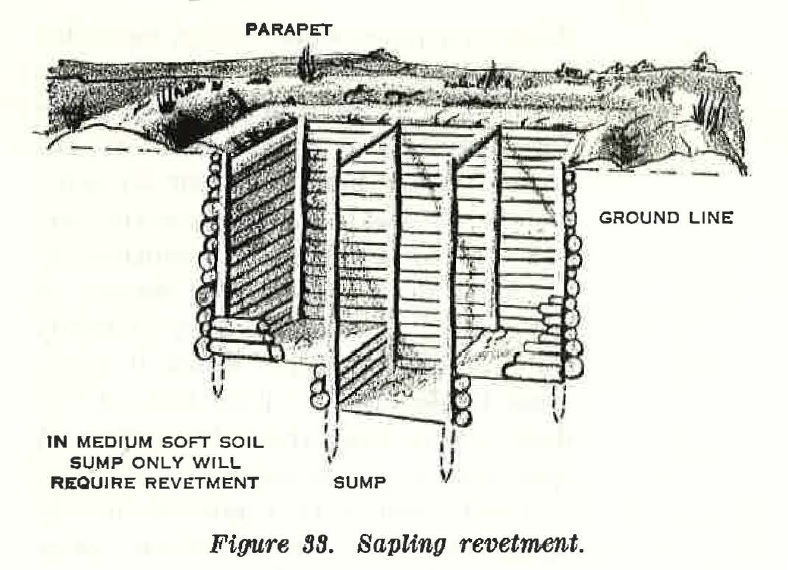
FIGURE 33. Sapling revetment.
(d) Grenade sump (fig. 39).
A grenade sump 45 centimeters (18 inches) long and 20 centimeters (8 inches) in diameter, cut at a 30° angle under the firing step, should also be prepared.
(3) Camouflage.
A continuous step in building any position is to hide it. When possible, do most of your work at night, keeping movement and noise to a minimum. Make a camouflage cover for your position, using natural material. Cover the open part so the hole does not show up as a dark spot. Make the cover so you can prop it up with stakes to observe and fire or let it down if you desire (fig. 32). Be sure to replace foliage as it dries out.
(4) Improvement.
Improvements consist of reinforcing, constructing storage space for ammunition, and constructing overhead cover; and later on, a place to sleep. Continue improvement until you leave the position.
(a) Reinforcing.
Sandy soil is apt to cave in at any time and almost any soil will cave in when wet. To prevent this, strengthen or revet the side of your position with cut saplings (fig. 33). This revetting requires a lot of saplings of about the same size, and something to hammer them into the ground. Shell cases, ammunition boxes, sandbags, scrap metal, chicken wire, corrugated metal, and scrap lumber may also be used. In a static situation or when material is scarce, revetting called "brushwood hurdle" may be built to the rear of your position and emplaced during darkness (fig. 34).
(b) A1n7l' Ammunition. Construct a storage space to keep your ammunition and grenades dry, clean, and readily available. You may use old ammunition boxes for this purpose. Install whatever type container you use into the side of your position within easy reach. When the enemy attacks, ammunition and grenades are readily available and serviceable. You may have only a few minutes in which to repel his attack. The quick and heavy volume of accurate fire permitted by a ready supply of ammunition may be the deciding factor.
(c) Cover (figs. 35 and 41). Your helmet gives some protection from shell fragments but you need more protection under heavy fire and nuclear attack. Get this protection by covering part of your position with at least 45 centimeters (18 inches) of hasty cover and if time permits, with 100 to 115 centimeters (3 to 5 feet) of logs, soil, rocks, and sod, in that order. If waterproofing is desired, place it between the sod and rock layers and between the rock and soil layers. Place paper, canvas, or empty sandbags between the log and soil layers to prevent dust from seeping through on you. Support the overhead cover on the surrounding ground. Never support the overhead cover on sandbags or the revetment. Both may settle or collapse under the weight.
(d) Sleeping quarters. Should you occupy a position for some time, it is necessary to construct some type of adjoining compartment for sleeping quarters. Your sleeping quarters should be similar to a prone emplacement, covered and adjoining your fighting position (figs. 37 and 40).
b. Hasty Positions (figs. 36--38). These are good for a short time because they give some protection from direct fire. If you stay in the area, they must be developed into well-prepared positions.

FIGURE 34. Making a "brushwood hurdle".
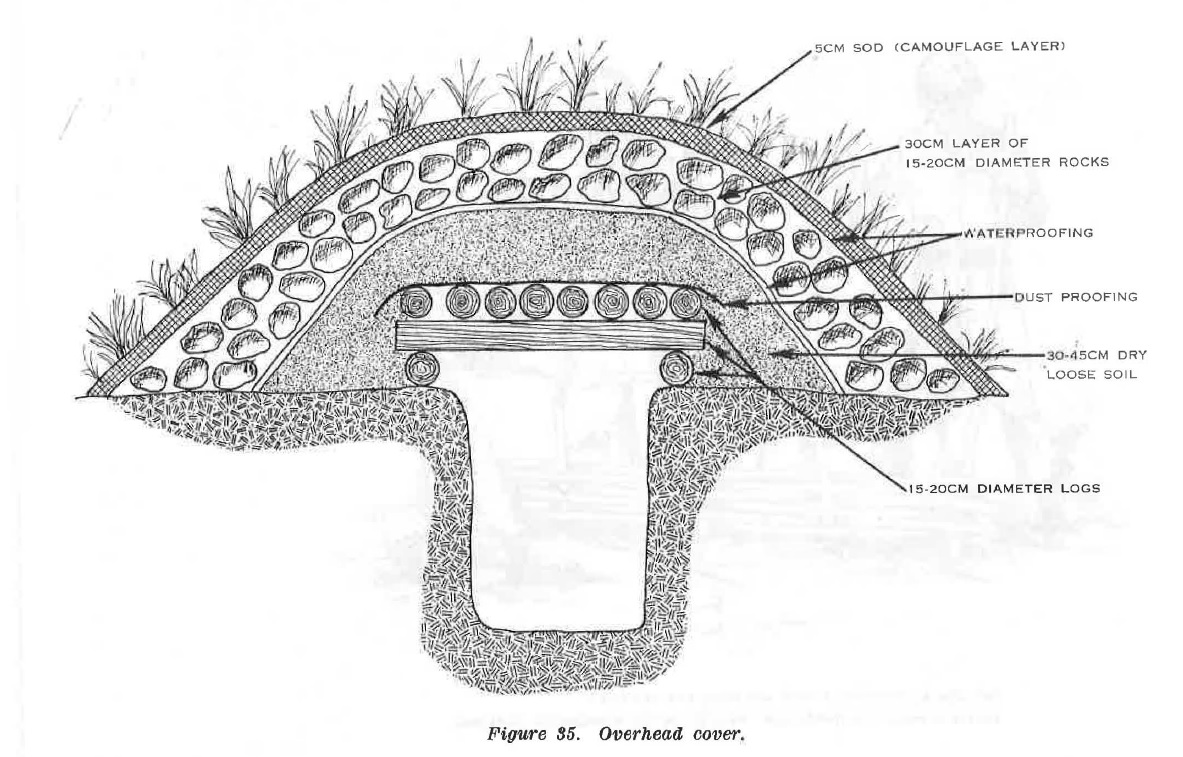
FIGURE 35. Overhead cover.
(1) Skirmisher's trench (fig. 36). A shallow trench with a ridge or parapet on the side toward the enemy provides body protection when you first stop. It can be developed into a prone emplacement or a one- or two-man foxhole if you stay in the area.
(2) Prone empku:ement ( fig. 37). This emplacement is a refinement of the skirmisher's trench and provides more protection.
(3) Shell crater (fig. 38). A shell crater can be quickly made into a hasty position.
(4) Tunnels. When narrow dikes, hedgerows, or levees are to be used for cover and concealment for a short time you may dig a tunnel through the embankment to form an opening to observe and fire at the enemy.
c. Types of Foxholes. There are two types of foxholes-the one-man foxhole and the two-man foxhole. The two-man foxhole is more desirable as it permits one man to work or rest while the other acts as security. Overhead cover may be added to either type.
(1) One-man foxhole (fig. 39). If you are assigned an individual position, dig a one-man foxhole. Dig a hole 60 centimeters wide (2 feet) by 107 centimeters long (3½ feet). Make it at least 120 centimeters deep (4 feet), deeper if you are a tall man, to protect you from the crushing action of tanks. Dig out another 45 centimeters (18 inches) to mu.kc
a. firing step and a grenade sump.
After the position is complete1y dug, put over head cover on the rear. (See the cover on the two-man foxhole illustrated in fig. 40.) Keep the overhead cover as close to the ground as possible but make sure you can see to shoot. Finally, make a camouflage cover (fig. 32) to put over the open part of your foxhole in the daytime. Be sure to move the camouflage cover aside at night.
(2) Two-man foxhole (fig. 40). If you are assigned a two-man position, you and your buddy can work together to dig a two-man foxhole in a hurry. If the situation requires, one of you can work while the other acts as security.
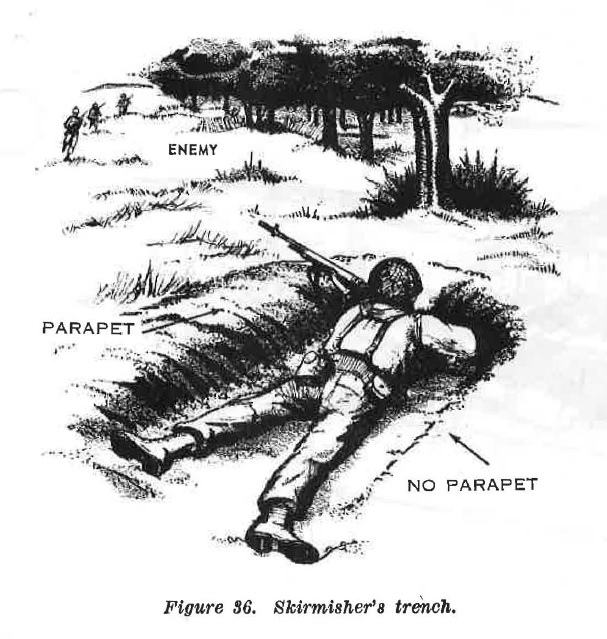
FIGURE 36. Skirmisher's trench.
d. One Hole (fig. 41). In rough 01· snow covered country, fl cave gives good protection. These holes are hard to dig but easy to hide if you carefully conceal the soil you dig out. Be sure to dig a sump for clminage. Make the inside just large enough for you and your weapon. In snowbank cn,ves, keep the fhing slot small bemtttse it shows up black in the white snow. A small snow cave is the warmest. Leave snow on the floor and pack it down. Make a small side or rear entrance.
e. Clearing Fields of Fire.
(1) vVhen you are on the offensive and in continual contact with the enemy, there is little opportunity to clear fields of fire. Advancing individual riflemen and weapons crews must select the best natural positions available, and orclirnwily you will have time to clear only the areas in your immediate vicinity. However, in preparing defensive positions for expected contact with the enemy, suitable fields of fire are cleared in front of each position.
(2) The following principles must be observed: (a) Do not disclose your position by excessive or ca1'eless clearing (figs. 42 and 43).
(b) In areas organized for close defense, start clearing near your position and work forward at least 100 meters (110 yards).
(c) In all cases, leave a thin natural screen of vegetation to hide defense positions.
(d) In sparsely wooded areas, remove lower branches of large scattered trees.
(e) In heavy woods, complete clearing of the field of fire may not be possible or desirable within the time available. Restrict work to thinning undergrowth and removing lower branches of large trees. C1ea1· nru.·1·ow lanes of fire for automatic weapons, making sure that you clear in an irregular pattern that will not reveal the weapons positions (figs. 42 and 43).
(f) Remove or thin dense brush. It is never a suitable obstacle and obstructs the field of fire.
(g) Cut weeds only where they obstruct your view.
(h) Drag away cut brush, limbs, and weeds to points where they will not be detected by the enemy or furnish him with concealment.
(i) Before clearing the fields of fire, you should make a careful estimate as to how much clearing can be done in the time available. This estimate often determines the nature and extent of the clearing to be undertaken, since a field of fire improperly cleared may afford the enemy better concealment and cover than if you left the area in its natural state.
(j) Cut or burn grain crops, hayfields, and tall grass areas if necessary to provide observation for firing or to prevent undetected enemy approach.
41. Defense Against CBR Attack There may be little or no warning before a CBR attack. Defense against such attacks begins when you build your position. Dig and cover your position as illustrated in figures 39 and 40. Positions prepared in this manner give you excellent protection against nuclear attack.
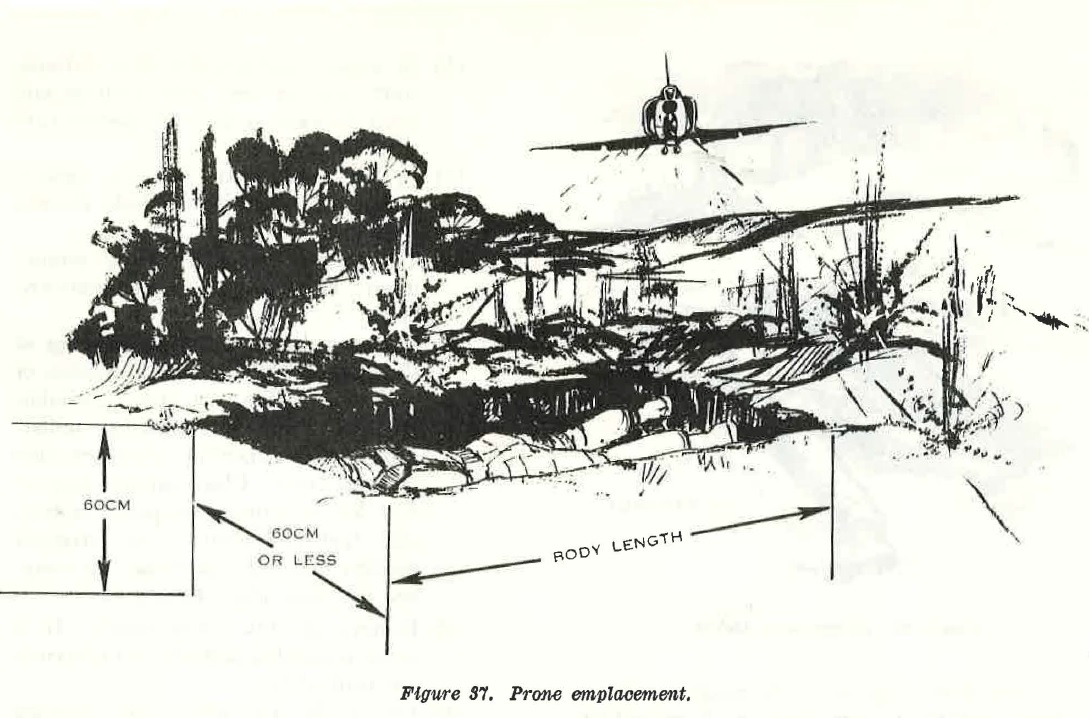
FIGURE 37. Prone emoplacement.
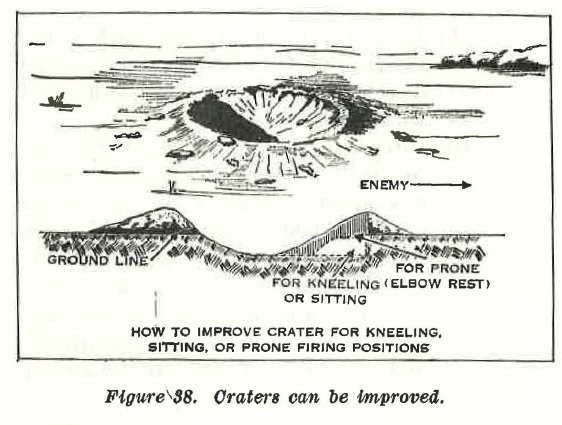
FIGURE 38. Craters can be improved.
a. Improvement of Protection. Modify your position to provide greater protection, especially if you have warning of a coming CBR attack. Cover entrances and apertures with scrap canvas or other durable material. This helps protect against the blast, heat, and radiation effects (including fallout) of a nuclear explosion (para 74), and against spray or droplets during a chemical attack. Wear your protective mask during a chemical attack and until the order to unmask is given by your commander. When a nuclear attack comes, sit down in your foxhole and keep your face down.
Remain in this position for several minutes afterwards. Remembers this-Chemical and biological agent vapor tends to drift to and remain in such places as dug-in positions and caves. Once chemical or biological agents have been used, or if their use is suspected, yon must wear yom· protecth e mask until you are sure there is no vapor agent in your position.
b. P1•oteotive Qumities of Clothing.
(1) Any type of clothing gives you some protection during a nuclear attack. If possible, cover yourself completely with your shelter half.
(2) Field unifor1ns can be chemically treated to protect you from vapors and fine droplets of blister agents. This is called impregnating (soaking with a protective material). However, impregnated clothing does not offer protection against chemical agents in a liquid state. Any drops of nerve or blister agents quickly go through impregnated clothing. A protective leather dressing ("dubbing") will be issued which helps make boots resistant to liquid chemical agents. This dubbing does not destroy
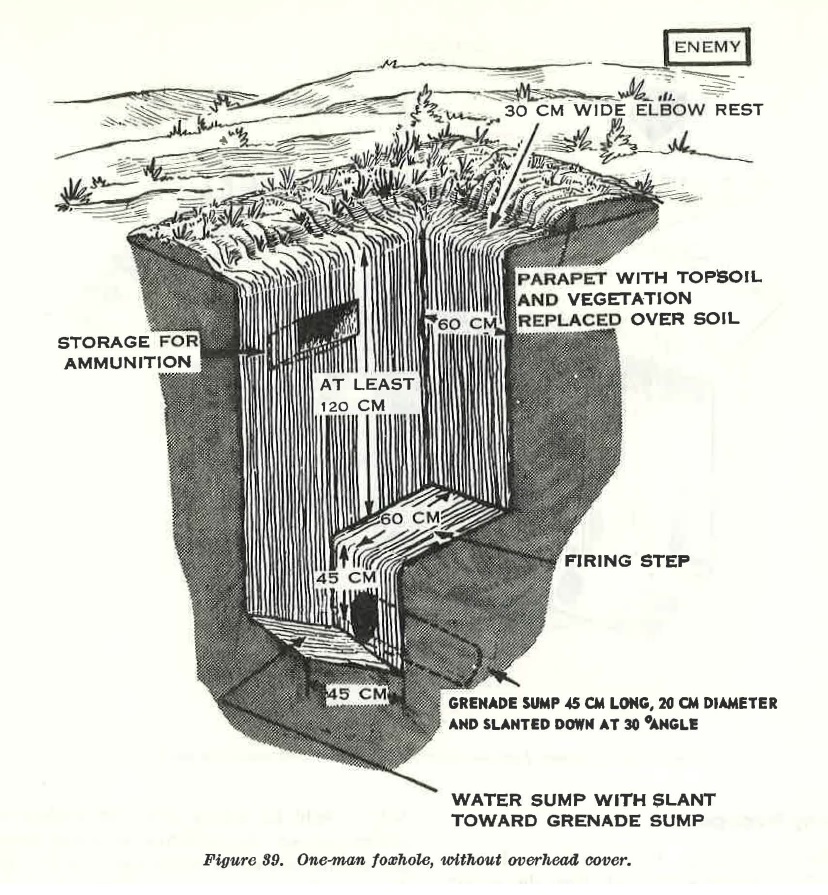
FIGURE 39. One-man foxhole, without overhead cover.
or neutralize liquid chemical agents, it only delays their penetration of leather. During a chemical attack, crouch down and cover yourself completely with whatever is available; use your mask. When walking through areas where drop of chemical agents may have fallen on vegetation, wear your raincoat or poncho to prevent these drops from reaching your clothing.
c. V s-lng the Protectve M Mk.
Your protective mask is your most valuable item of defense during a CBR attack. If worn properly it protects your face, eyes, and lungs from all known chemical agents, radioactive dust during a nuclear attack, and biological agents during a biological attack. This mask is sturdy, but you can damage it by careless handling. Keep your mask clean and properly adjusted for immediate use.
d. Sanitation.
Should the enemy employ biological weapons, you can protect yourself somewhat by exercising good sanitation measures and practicing good personal hygiene.
e. Training.
FM 21-40, FM 21-41, and FM 21-48 explain in detail all matters concerning your defense against chemical, biological, and radiological weapons, to include effects of nuclear weapons. Your CBR training teaches you about its effects, capabilities, and limitations. CBR training also teaches you the use and care of your protective equipment.
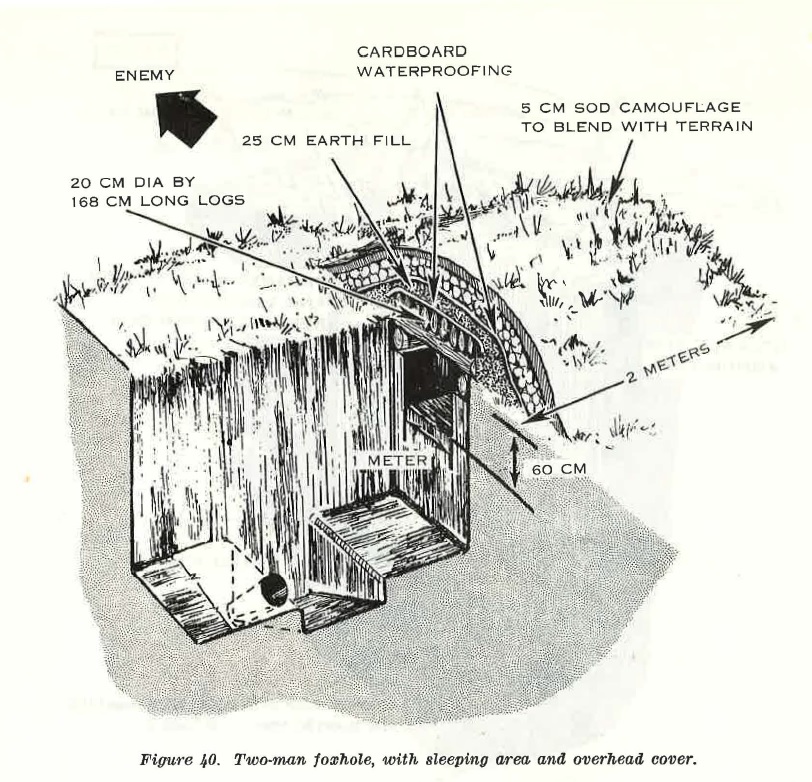
FIGURE 40. Two-man foxhole, with sleeping area and overhead cover.
42. Enemy Propaganda.
a. What is Enemy Propaganda?
Enemy propaganda is information and ideas the enemy directs toward you with the intent of having you act in a way which will help him. The enemy says and writes things he hopes will cause you to be a less effective soldier. This material is usually put out in leaflets dropped from aircraft or fired by enemy artillery into your area, in radio broadcasts, in field public address systems beamed toward you, and in rumors started by enemy agents.
b. Purpose.
The enemy uses propaganda to try to lower your morale and weaken your will to fight.
c. Techniques.
The enemy uses many different propaganda techniques. He tries to convince you that unless you surrender you will be killed; and if you do surrender, you will be well treated. He tries to lower your morale and decrease your will to fight by telling you your leaders are incompetent, or the civilians at home have forgotten the soldiers who are away on the fighting fronts. He starts rumors. You he1p his cause if -you believe and spread these rumors. Some rumors are easy to believe because you want to believe they are t.ru . For example, the enemy will start rumors that your unit is going to be relieved and sent home. I£ you believe this rumor, yom· morale is lowered when you find it is not true. Other rumors are designed to crea,te fear; still otlrnrs attempt to create a feeling of hatred toward our allies or soldiers of our own forces because of their race or creed.
d. Defense. When you are well-trained and confident of your ability and that of your unit, you tire a poor target for enemy propaganda. When you know the goals of your country and those of the enemy and use your common sense and intelligence, you are able to detect the half truths and lies in enemy propaganda. Do not spread rumors when you read or hear enemy propaganda; get the facts and do not jump to Conclusions. Challenge any person voicing a rumor by asking, "What is the source of that information and How do you know that information is true ? "
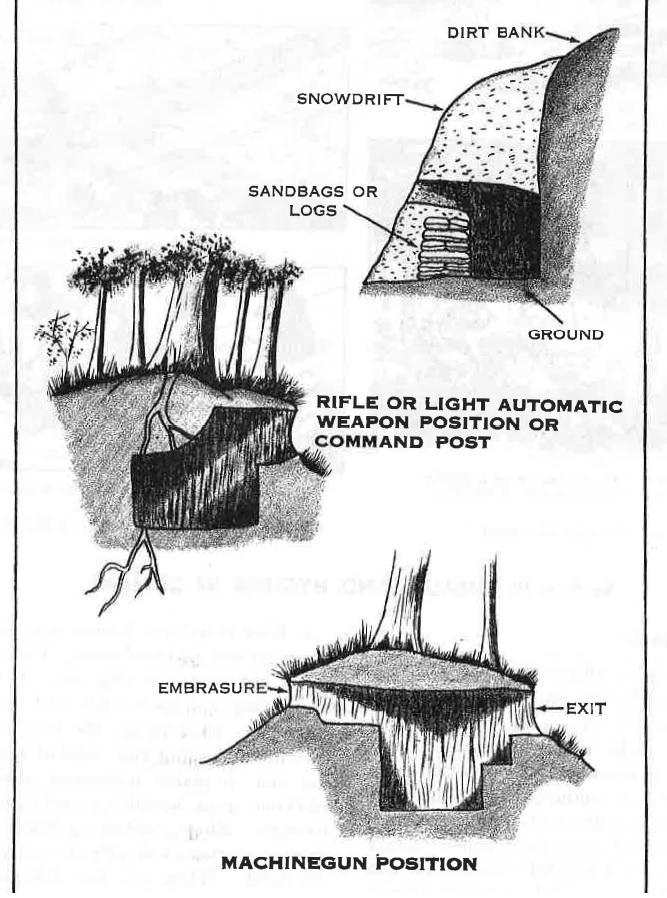
FIGURE 41. Types of cave holes.
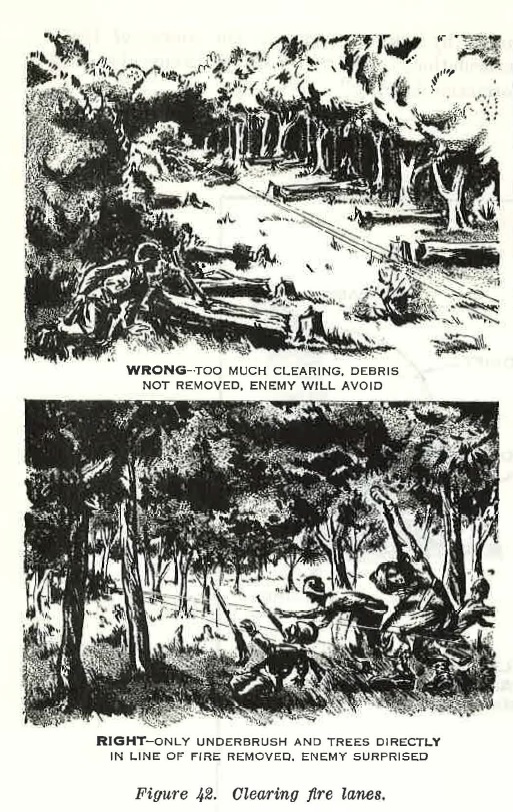
FIGURE 42. Clearing fire lanes.
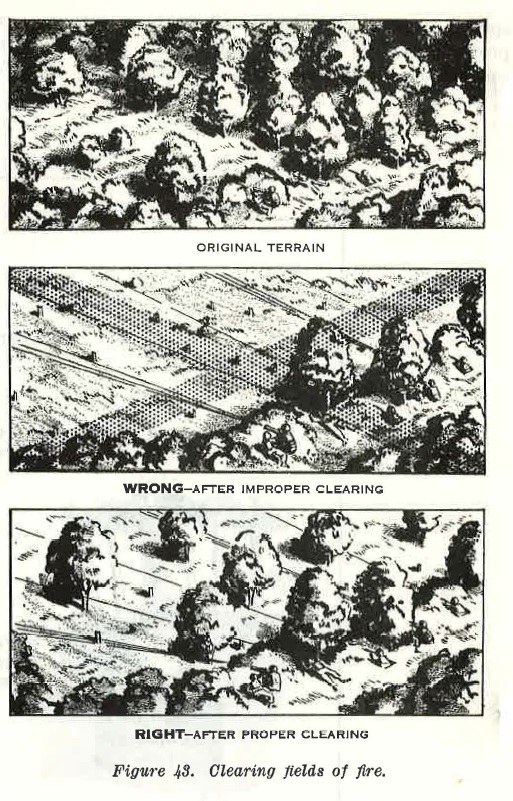
FIGURE 43. Clearing field of fire.
SECTION III. HEALTH AND HYGIENE IN COMBAT
43. Mental Attitude.
The way you think a:ff ects the way you act. If you know your job, you act quickly and effectively. I£ you are uncertain or doubtful, you hesitate and may make wrong decisions. Positive thinking is a necessity. You must enter combat with absolute confidence in your own ability to fight, in the training you have received and in the officers and noncommissioned officers to lead you. You will feel better, and yolll' life the Army will have a sense of real purpose, 1£ you realize your unit exists for the best cause in the world-to protect your country, your family, and yourself. Furthermore, you are a needed and valuable part 0£ a team. Always ask yourself, "How can I help my team accomplish its mission?"
a. Fear is a basic human emotion.
It is both a mental and physical state. Fear is not shameful if you control it (fig. 44). It actually helps by making you more alert and more able to do your job. Fear makes the pupils of your eyes enlarge, increasing your field of vision and enabling you to detect movement more easily. In addition, your breathing and heart actions are stronger. These reactions prepare your body for greater exertion and provide strength when you are tired. When you feel fear, control it and use it to help you do your job.
b. Avoid letting your imagination run wild.
Remember you are not alone. You are part of a team and there are other soldiers around you, even though you cannot always see them. There are men on your right and on your left who know their jobs and who are helping you just as you are helping them.
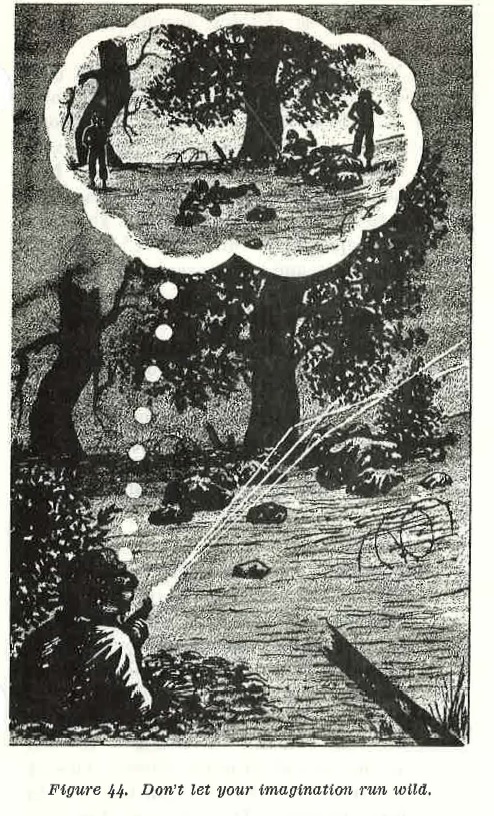
FIGURE 44. Don't let your imagination run wild.
c. Worry undermines the body, dulls the mind, and slows down thinking and learning. It adds to confusion and magnifies your troubles, causing you to imagine things which really do not exist. Your officers and noncommissioned officers will help you if you have problems which are-troubling you.
d. You may be required to fight in any part of the world and in all types of terrain. Adjust your mind to accept conditions as you find them. Adapt yourself mentally and take prompt, positive action to overcome adverse conditions. You will find you can fight under almost any conditions.
44. Physical Efficiency and Resistance To Disease
a. An athlete knows from experience he :rp.ust keep his body in good shape. He avoids late hours and habits which will slow him down. He has pride in himself and his team. You must do the same. Your safety, your health, and your life depend on your physical condition.
b. Your body processes are sluggish and your reactions slower when you are tired. You are more susceptible to sickness. Avoid fatigue by taking advantage of your opportunities to rest. Do not wear clothing which binds or chafes the skin because it adds to fatigue and discomfort.
c. When you have the opportunity to rest, make yourself as comfortable as possible. If you sleep on the ground, smooth out the dirt and dig a small depression for your hips. If you sleep in a dug-in position, dig out enough soil so you can stretch your legs. Cramping interferes with circulation, causes sore muscles, and hinders the body rest processes.
d. Maintain peak efficiency by observing good eating habits. It is important to eat as nearly balanced meals as possible. If you do not feel like eating a whole meal, eat some of each item, part of the meat, part of the vegetables, and part of the bread. Keep your eating utensils and mess gear clean.
e. Heat your rations whenever possible; they will taste better. 45. Body Care Under Varied Climatic Conditions.
a. Trench Foot and Immersion Foot (fig. 45).
(1) In cold or wet weather, improper care of your feet may result in a condition known as trench foot or immersion foot. When the condition is mild, the feet are pale and look shriveled; later they lose all feeling. Still later, they swell and become very painful. This is the dangerous stage. Gangrene may result and require amputation of the toes or even the entire foot.
(2) To guard against trench foot and immersion foot, follow the simple rules listed below-
(a) Exercise your feet.
(b) Keep your feet as clean as possible.
(c) Keep your feet as dry as possible.
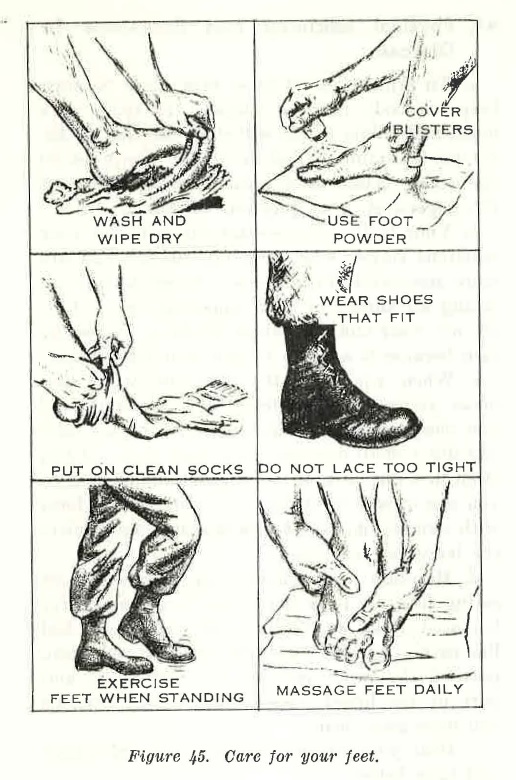
FIGURE 45. Care for your feet.
(d) Put on clean, dry socks as often as possible.
(e) Do not wear tight boots or tight socks.
(f) R move your boots and massage your feet.
(3) It is especially important to exercise your feet in order to maintain circulation when standing in mud for long periods wiggle your toes inside your boots, rise on your toes and bend and twist your ankles. Remove your boots at least once a day and massage your feet carefully and gently to stimu1ate your circulation. Use plenty of foot powder and put on dry socks. You can dry wet socks by carrying them llllclernentb yom· shfr next to your underwear.
(4) Do not slow circulation by putting on extra, socks or by wearing tight. boots. I£ your boots feel tight, loosen the laces. Wear loose clothing around the knees and calves of your legs.
(5) You nllll,of; n,hva.ys keep your feet dry, but you can usually improve conditions. If it is necessary to stand for a long time in 1~ mu i :l.y foxhole, dig an extra deep sump hole at one side of your foxhole to help drain off water. Stones and logs in he bottom of the hole also help to keep you out of the mud. Change into dry boots and socks every time you get the chance.
(6) "When you come into a heated shelter after a long period of standing in the cold or wet, keep your feet away from the source of heat until the circulation starts coming back. Too much heat applied too suddenly is dangerous because it ensures a sudden deulurging of blood vessels and a rush of blood to tissues not ready to receive it.
b. Frostbite.
(1) Frostbite or local freezing can be avoided by wearing warm and loose clothing; keeping dry; exercising your feet, legs, arms, al1(1 hands; and by iuas. aging your fears and face. Proper footwear and mittens are especially important. If any part of your clothing becomes wet, dry or change it as soon its the tactical situation allows. One of the best ways to avoid cold injury is to keep moving. Do not stop for long periods of time. When you must stop, continue to exercise and massage. You Ctln get overheated and pers1 fre in cold climates and his perspiration may later freeze inside your clothes. Avoid this by wearing lighter clothing when you are exerting yourself, or by opening your clothing to allow air to circulate and moisture to escape. Do not touch cold metal with your bare hands or lips. Skin immediately freezes to such surfaces. If the skin should adhere to a metal surface, release it by warming the metal. The skin will be damaged if forceably separate it from the metal.
(2) If a part of your body gets frostbitten, it becomes grayish or white and loses feeling. Frequently there is no pain, so keep watching your face and hands and those of your companions for signs. The face, hands, and feet are the parts most frequently frostbitten.
(3) To thaw a frostbitten part, put it next to a warm part of your own body or next to the warm part of someone else's body. For example, put your left hand under your right armpit and cover the part with extra clothing or blankets.
(4)If pain becomes too severe while a part is thawing, slow the thawing by exposing the part to cool air.
(5) Do not rub or bend a frostbitten part of the body. Do not rub it with snow or ice. Do not dip it into warm water or bring it close to a fire.
c. Heat Cramps.
Heat cramps occur when you have been sweating a great deal and have not taken extra amounts of salt. Symptoms are muscle cramps, especially of the intestines abdominal wall, arms, or legs. You may ;omit and be very weak. Treatment is to give large amounts of salt water-two salt tablets per canteen.
d. Heat Exhaustion.
Heat exhaustion is c~used by excessive loss of water and salt from the body. This condition results from heavy sweating. Symptoms of heat exhaustion may be any, or a combination, of the following: paleness, dizziness, profuse sweating, faintness, cool and moist skin, or abdominal cramps and muscular cramps of the back, arms, or legs. Immediate treatment-move the patient to a cool place, remove his outer clothing, elevate his feet, move his legs up and down or massage them give him two salt tablets or a quarter tea spoon of salt in each canteen of water administered. Get medical aid for further treatment. You can usually avoid this condition by taking plenty of salt with your food or by adding salt tablets to your drinking water.
e. Heatstroke.
Heatstroke, a very serious condition with a high death rate, is characterized by very high body temperature and unconsciousness. A stoppage of sweating and hot dry skin are warnings. The victim's skin takes on a bright pink color and he may become delirious. Lower his body temperature by using shade, removing his clothing; immersing him in or sprinkling him with cool or cold water, and fanning him with his shirt. Get the aid of a medical officer immediately.
46. Body Cleanliness.
a. You can keep well only by observing the basic rules of personal hygiene. Practice and correct thin:king make these health rules habitual.
b. If possible, bathe your entire body at least once a week with soap and water. Pay particular attention to the groin and the area underneath the arms and be sure to rinse off the soap. When bath facilities are not available, take a sponge bath by using your helmet to hold the water.
c. If no bathing facilities are available, dry and wipe your body with a towel, or with your used underwear, when you change. ProtPct yourself against lice and other parasitic insects by dusting the seams of your clothing with issue insect powder.
d. Underclothing absorbs perspiration and oil from the body and soon loses its insulating qualities and needs to be changed. When wearing woolen underclothing, avoid frequent changes by wearing light, easily washed under clothing next to your skin.
e. Care of the feet is important to every soldier. Start every day with a clean pair of socks. Feet swell some during the day, particularly during a march, so do not crowd on extra socks. Wear enough to be comfortable and to cushion the feet but not enough to cause tightness which cuts off circulation. A void wearing torn or poorly mended socks-they cause blisters. When changing socks, wipe each foot thoroughly with the top of the used sock, rubbing well between your toes; use foot powder and put on fresh socks, smoothing out all wrinkles. When wearing more than one pair of socks, change the pair next to your skin. Always carry extra socks in the top of your pack where they can be slipped out without disturbing the entire pack.
f. If a blister develops and medical care is not available, you should:
(1) Wash the blister area.
(2) Open the blister by breaking it at the lower edge with a sterilized needle or knife point. A needle or knife point can be sterilized by heating with a match or cigarette lighter.
(3) Drain the liquid from under the skin.
(4) Cover with a band-aid or adhesive plaster. g. Do not use ointments, salves, or medicines on your feet unless prescribed by a medical officer. Many commercial medicines tend to soften the skin or to increase sweating. Prevent corns and calluses by wearing properly fitted boots; if you get a corn or callus, let an aid man treat it.
h. Athlete's foot is a condition of the feet caused by a fungus. This fungus grows best in warm and moist places such as your feet. You can prevent it from spreading by keeping your feet clean and using foot powder to help keep them dry.
i. Brush your teeth at least once a day. Salt from rations can be used if no tooth powder or paste is available. Brush with water alone if no cleanser is available. Carry your toothbrush with your minimum essential toilet articles.
j. Keep your hair clipped short to avoid picking up dirt and vermin. Short hair is sanitary and comfortable.
k. Use your training to do all you can to help yourself and your companions.
47. Food Sources Sanitary standards in many oversea areas are not as high ns in the United States. Foods prepared and handled by natives, or purchased from open air markets, are particularly dangerous. they are loaded with disease germs, not only from handling by many people, but from contact with flies which have access to open air latrines. In many countries, human feces are used as guden imd Held fertilizer. This practice spreads diseases. You usually suffer more from these diseases than the. natives do because they are often immune to the local germs. The safest rule to follow is to eat and drink nothing except tlutt, which is issued to you or which has been investigated and approved for consumption.
48. Water Conservation and Purification
a. Learn to use only the amount of water absolutely necessary for drinking, bathing, and cooking purposes. Water is essential to the continued effectiveness of your unit and must be conserved.
b. Contaminated water is one of the greatest threats to the health of a soldier in the field. Water obtained from other than an approved source must be considered contaminated and must be purified before drinking. This may be done by using individual water purification tablets (iodine) in your canteen. Add one tablet to one (quart) canteen of clear water, two tablets if it is cloudy, and replace the cup loosely. Wait 5 minutes and then shake well, allowing some leakage. Then tighten the cup and wait an additional 20 minutes before using for any purpose. If water purification tablets are not available, water may be purified by heating it to a "rolling" boil for 15 seconds. Longer periods of boiling may be prescribed by the command surgeon if medical evidence indicates that 15 seconds is not sufficient to render the water safe.
49. Replenishing Salt and Body Fluids The principal means of cooling the body is by sweating. To keep up an adequate production of sweat, you must drink plenty of water. However, profuse sweating takes large amounts of salt from the body, a chief cause of heat exhaustion and heat cramps. Take additional quantities of salt with your food and add salt tablets to your drinking water.
50. Waste Disposal.
a. Tin cans cut tires, litter up an area, breed mosquitoes when full of water, and draw flies. Food stamps ii.ttrnct riits, roilehes, and flies. l3ury your waste when you finish eating. Smnps should be dug in o.reas occupied fm· extended periods. Do not ignore cleanliness just because you are leaving an area; protect the health of the troops who follow you into an area. You know how you feel when you have to move into a filthy area.
b. Of all types of waste, human waste is the most frequent conveyor of intestinal diseases; thus, it is essential that you always bury your feces. Dig n. smaU hole if you are on a march or use a straddle trench or deep pit latrine in a temporary camp or bivouac.